u-blox GPS Baud Rate Configuration
Here is a problem that looks like a dead GPS module and is not one.
You buy a GPS module, use it on an ArduPilot build, and it works perfectly. Later you move it to a Betaflight quad — and Betaflight cannot find it at all. The wiring is right, the port is right, the module powers up. Nothing.
The cause: ArduPilot reconfigures the receiver's port to a faster baud rate — often 230400 — and that setting lives in the module, not the flight controller. It travels with the module. Betaflight only supports 115200 and below, so it is listening at a rate the module no longer speaks.
This guide fixes that with u-center, u-blox's own configuration tool, and a USB-to-TTL adapter. The same procedure sets a u-blox module to any rate you need.
It covers modules built on u-blox chips — the MG-A01, M10G-5883, MG-902 and MG-903, the MG-F10-C, and the u-blox-based MA-RTK-AIR-F9P. The Unicore-based RTK modules use a different tool.
What you need
Software
- u-center — u-blox's official tool. Recent versions all work; the screenshots here are from a current release.
- A USB-to-serial driver for your adapter, if Windows does not already have one:
- CH340 / CH341 adapters — WCH driver downloads
- CP210x adapters — Silicon Labs driver downloads
Hardware
- A u-blox GPS module
- A USB-to-TTL serial adapter
- Jumper wires, or the module's own connector lead
Wire it up
Power straight through, data crossed:
| USB-to-TTL adapter | GPS module | |
|---|---|---|
| 5V | 5V | power |
| GND | GND | ground |
| TXD | RX | adapter transmits → module receives |
| RXD | TX | adapter receives ← module transmits |
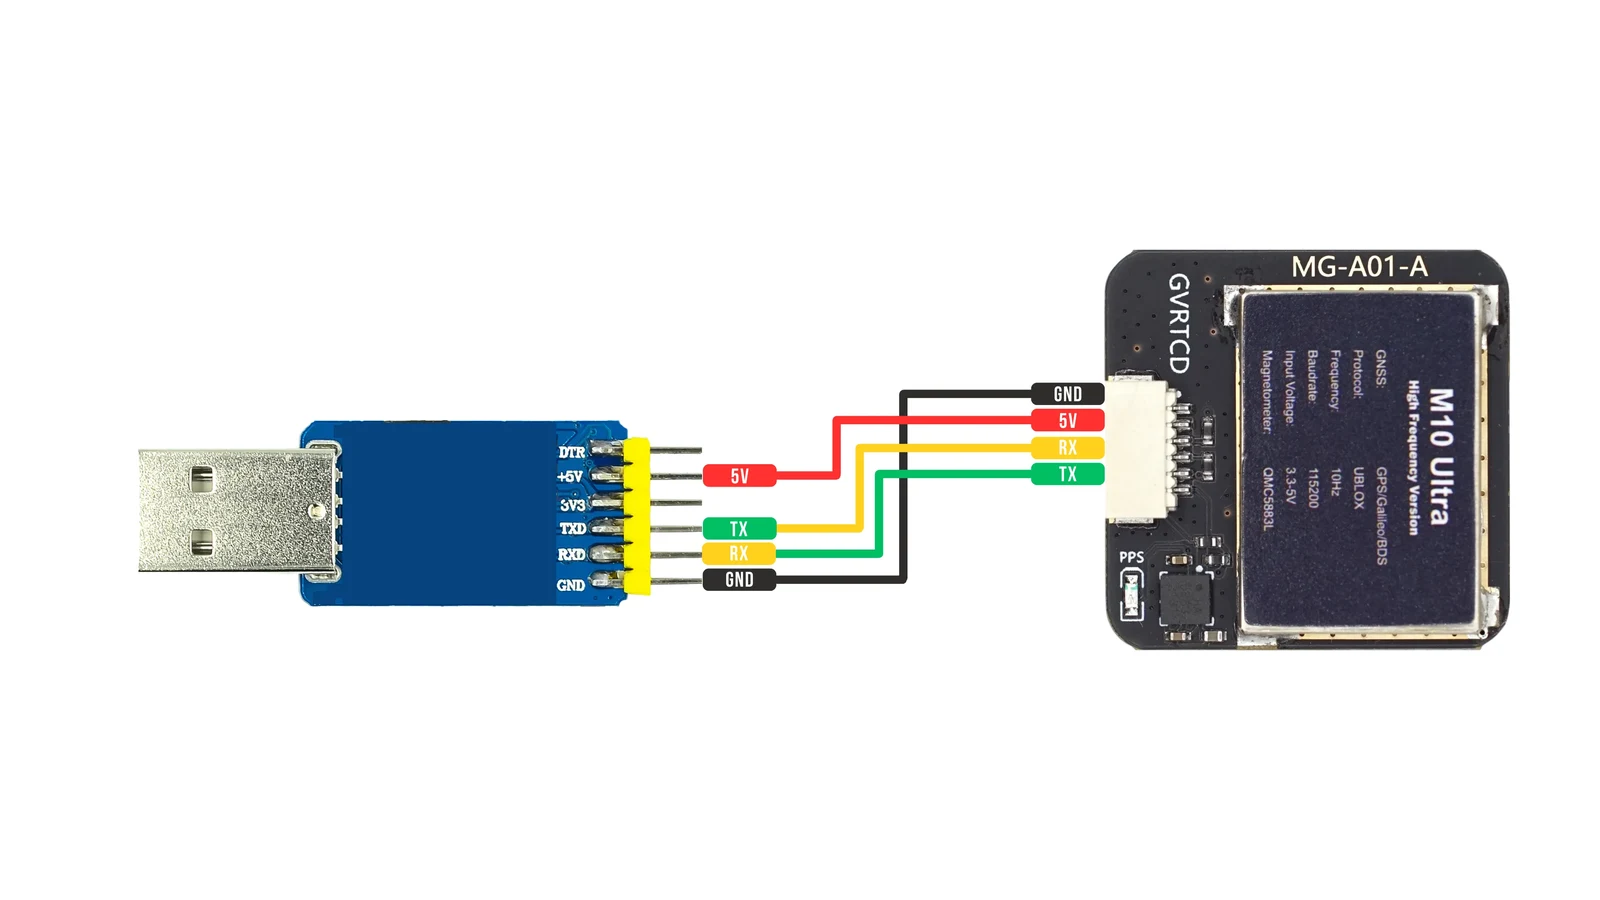
Plug the adapter into the computer, then open Device Manager and find it under Ports (COM & LPT). Note the COM number — you will need it in a moment.

Nothing listed? Either the driver is missing, or the USB cable is a charge-only one.
Step 1 — Connect
You do not yet know what rate the module is running at, so let u-center find out.
- Open u-center.
- Receiver → Autobauding — switch it on.
- Receiver → Connection → pick your COM port.
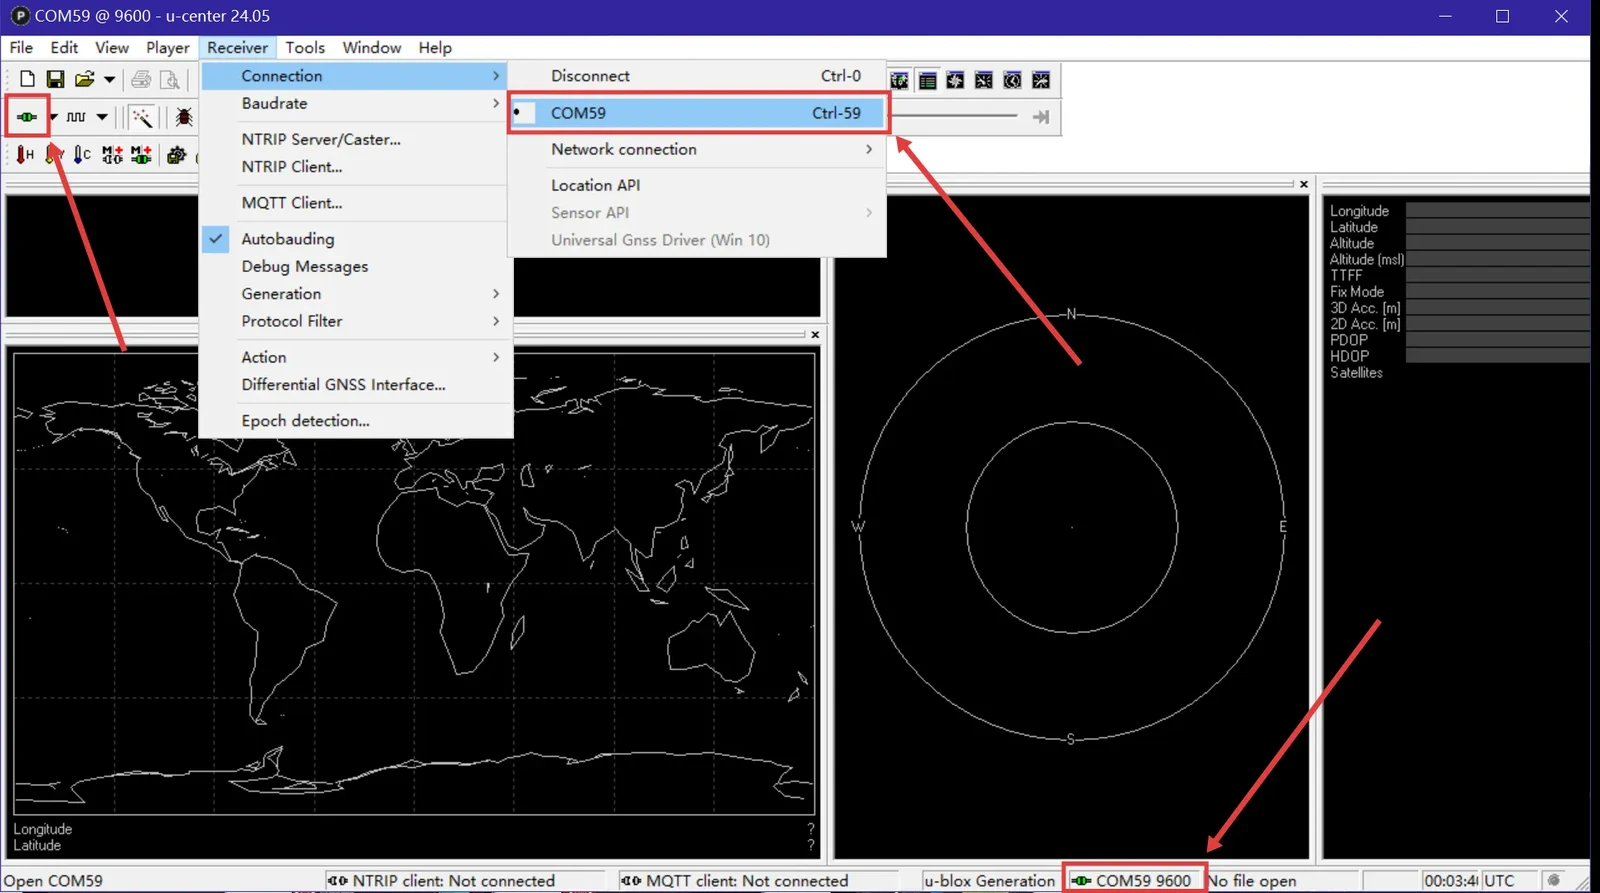
When it connects, the status bar at the bottom turns green and blinks, and shows the baud rate it found.
Step 2 — Read the current rate
- View → Configuration View (
Ctrl+F9). - In the list on the left, select PRT (Ports).
- Read the Baudrate field and write the number down.
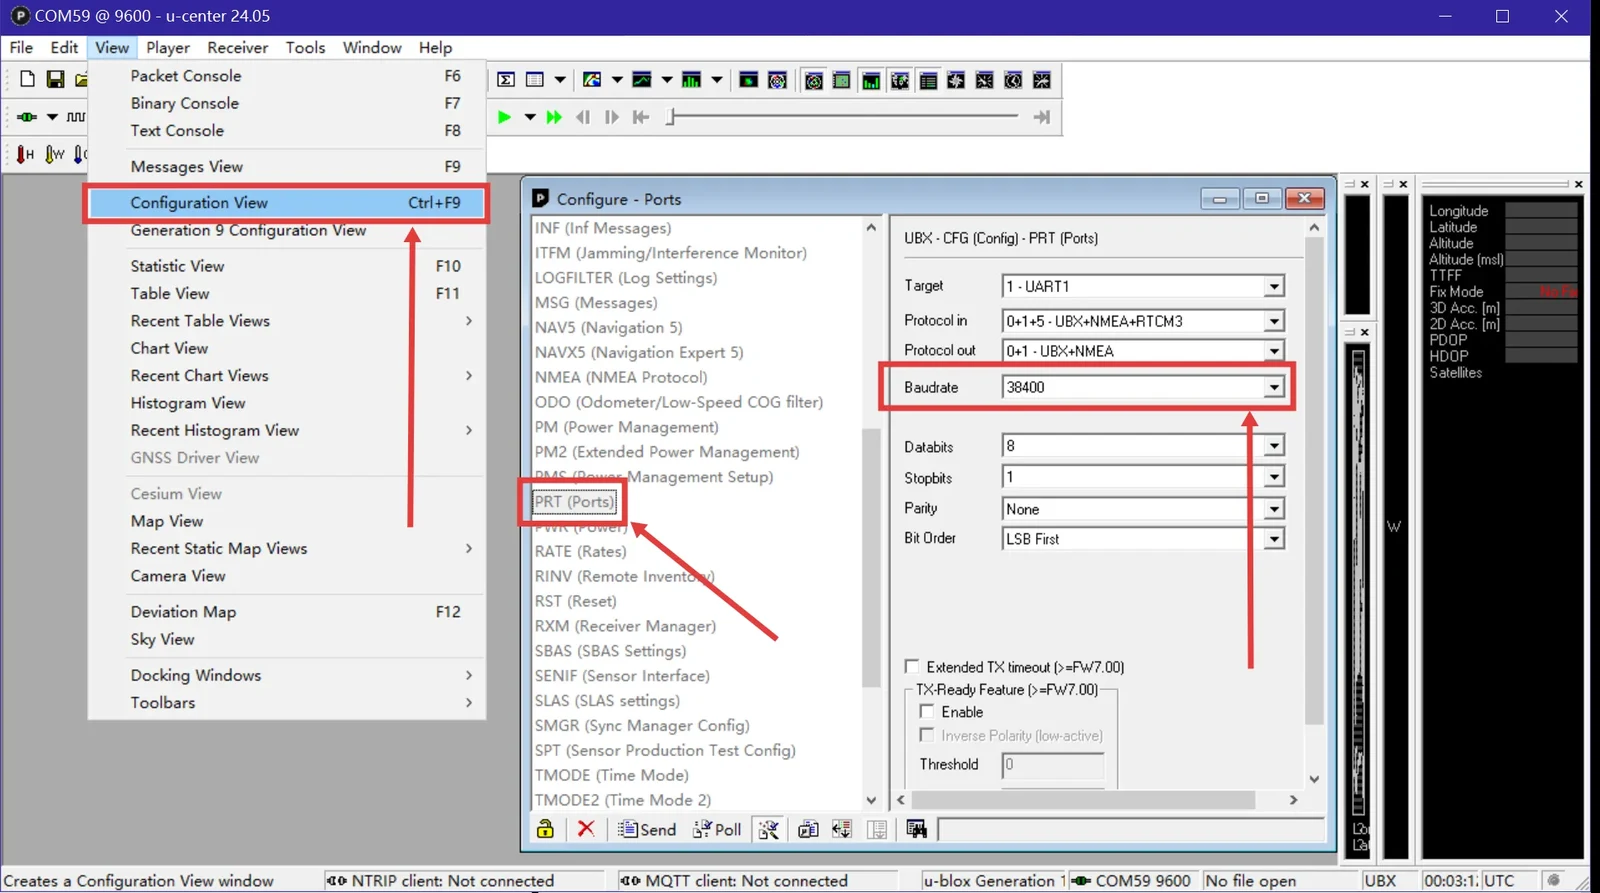
This is what the module is actually set to — the factory value, or whatever the last autopilot left behind.
Step 3 — Lock u-center to that rate
Autobauding is useful for finding a connection and unhelpful for changing one, because it keeps re-hunting while you are trying to make a deliberate change. Pin it down:
- Receiver → Autobauding — switch it off.
- In the toolbar's baud rate box, select the same rate you just read.
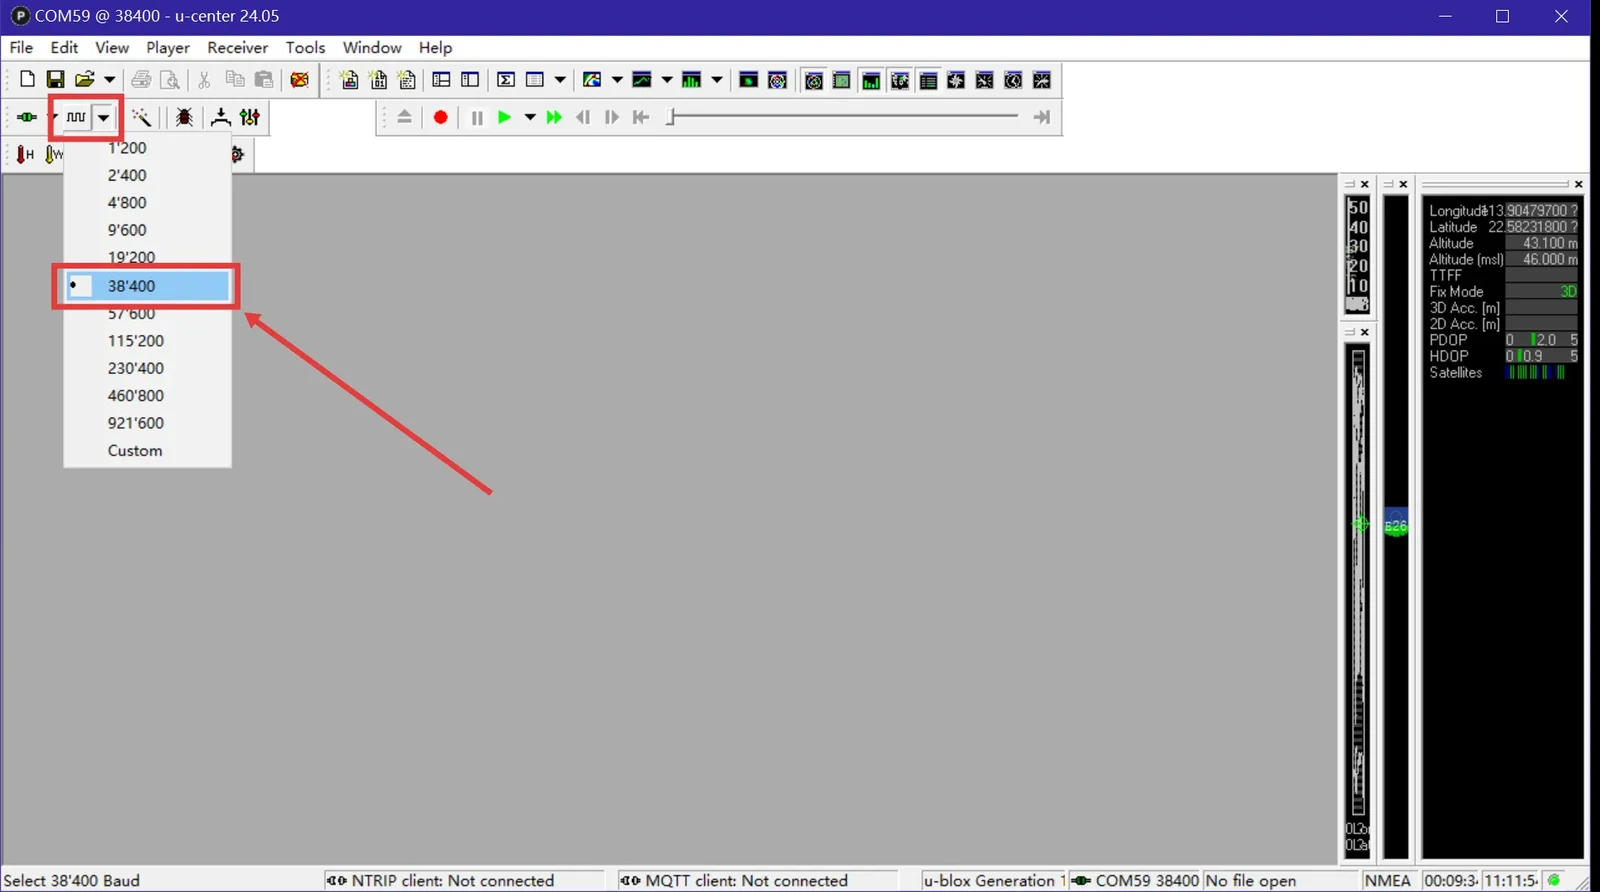
- Press F6 to open the Packet Console. Messages should be scrolling past.
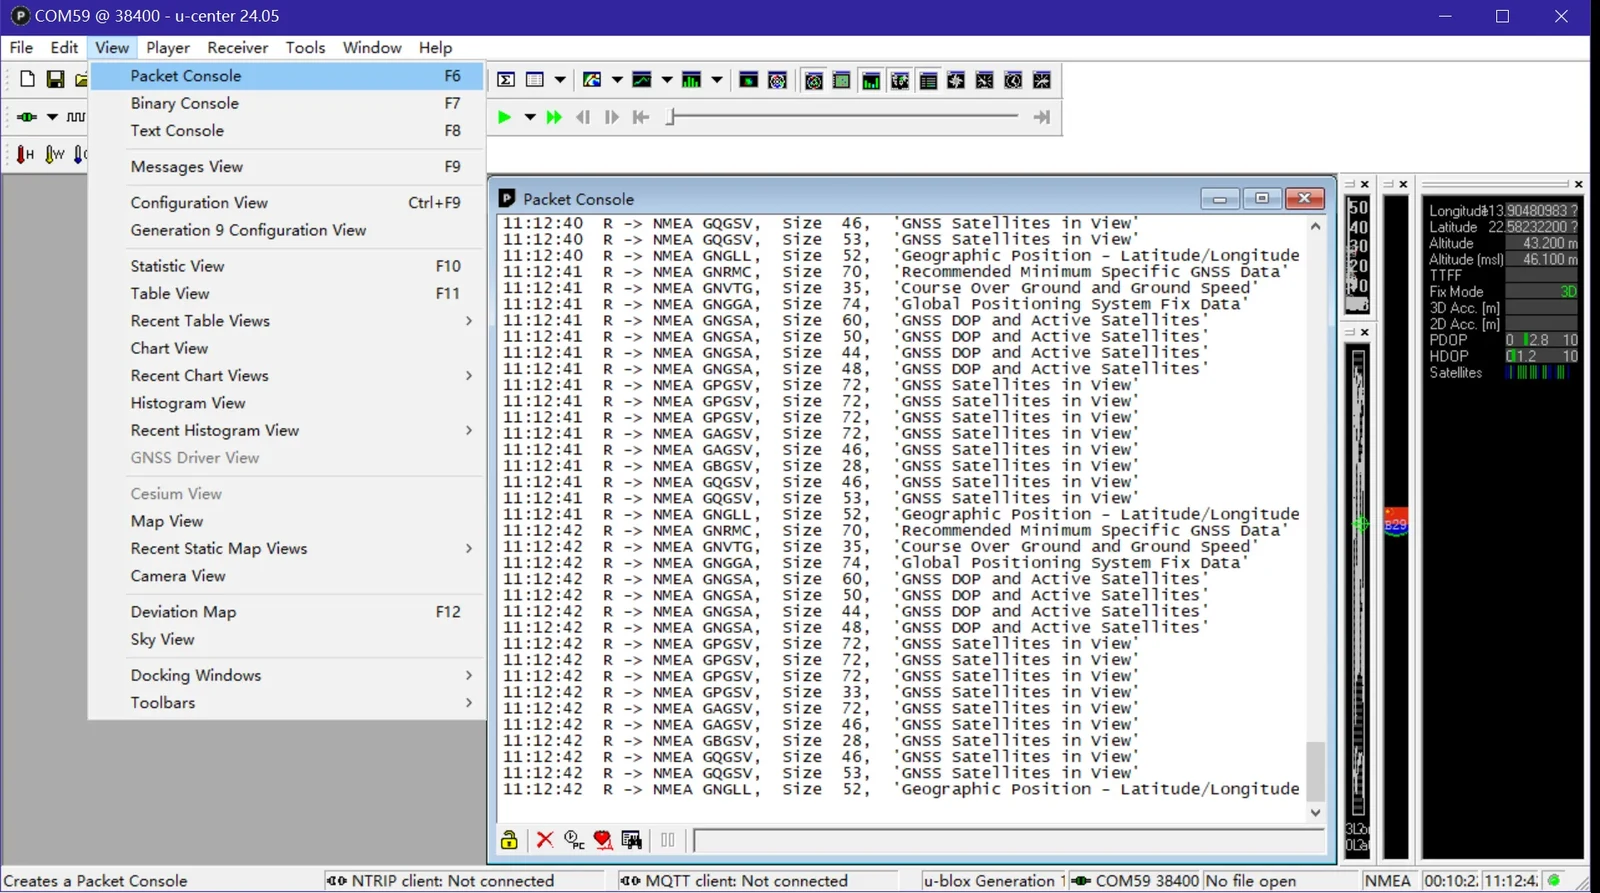
Scrolling data means a solid, stable link. Do not continue without it — a half-working connection is how configuration changes get half-applied.
Step 4 — Set the new rate
- Back in Configuration View → PRT (Ports).
- Change Baudrate to your target value — 115200 for Betaflight compatibility.
- Click Send at the bottom left.
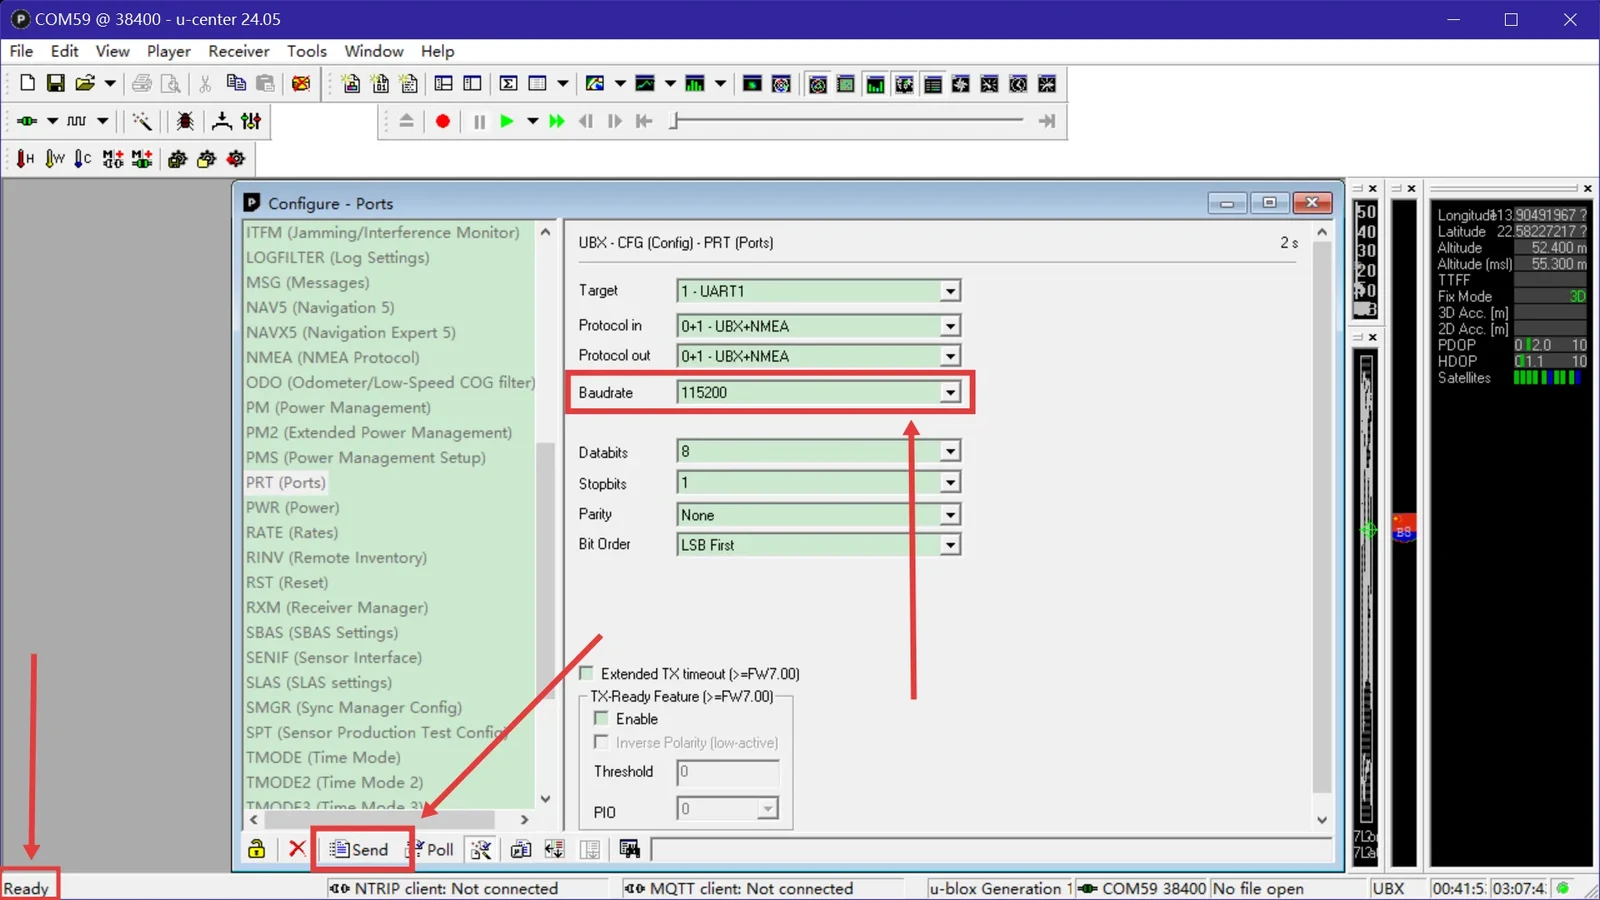
The connection will now break. That is correct and it is the proof it worked: the module switched to 115200 the instant you pressed Send, and u-center is still talking at the old rate.
Step 5 — Save it permanently
Do not skip this. What you did in step 4 changed the running configuration only. Power-cycle now and the module goes straight back to the old rate — which is exactly how people end up repeating this procedure three times and concluding the module is faulty.
- Change the toolbar baud rate to 115200 so u-center reconnects.
- In Configuration View, select CFG (Configuration).
- Tick Save current configuration.
- In the Devices list, select all entries, 0 through 4 (they highlight blue).
- Click Send.
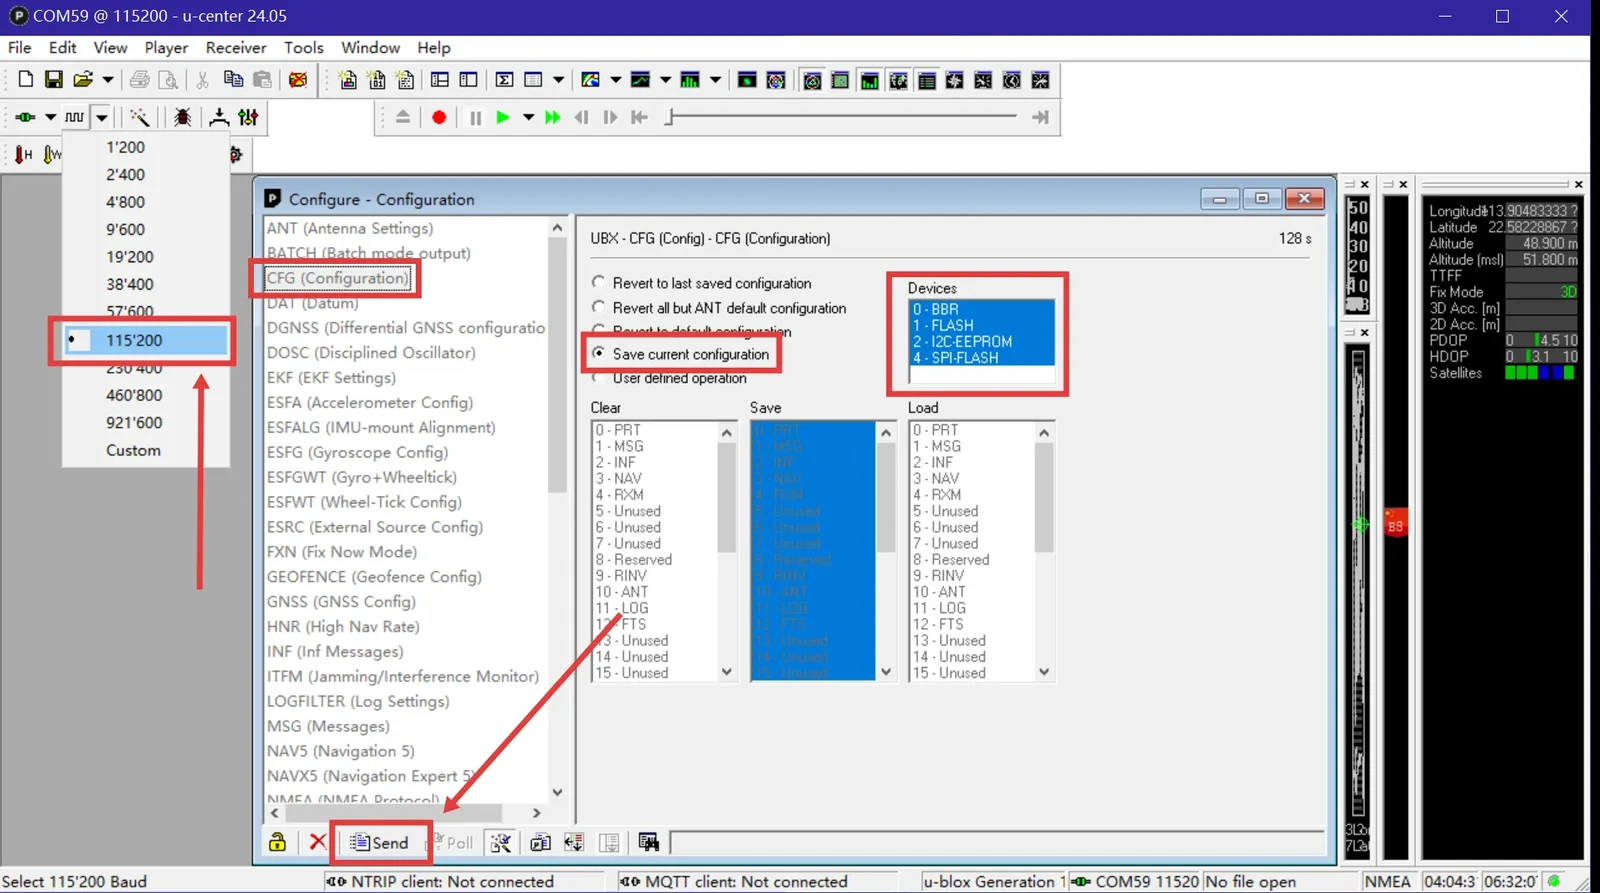
Selecting every device entry writes the setting to whichever non-volatile memory the module actually has, without you needing to know which that is.
Step 6 — Verify with a cold start
The only test that means anything is one that removes power completely.
- Close u-center, unplug the adapter, and leave it unplugged for a moment.
- Plug it back in and reopen u-center.
- Set the toolbar baud rate to 115200 directly — do not use Autobauding, because it would connect at any rate and tell you nothing.
- Connect, then press F6.
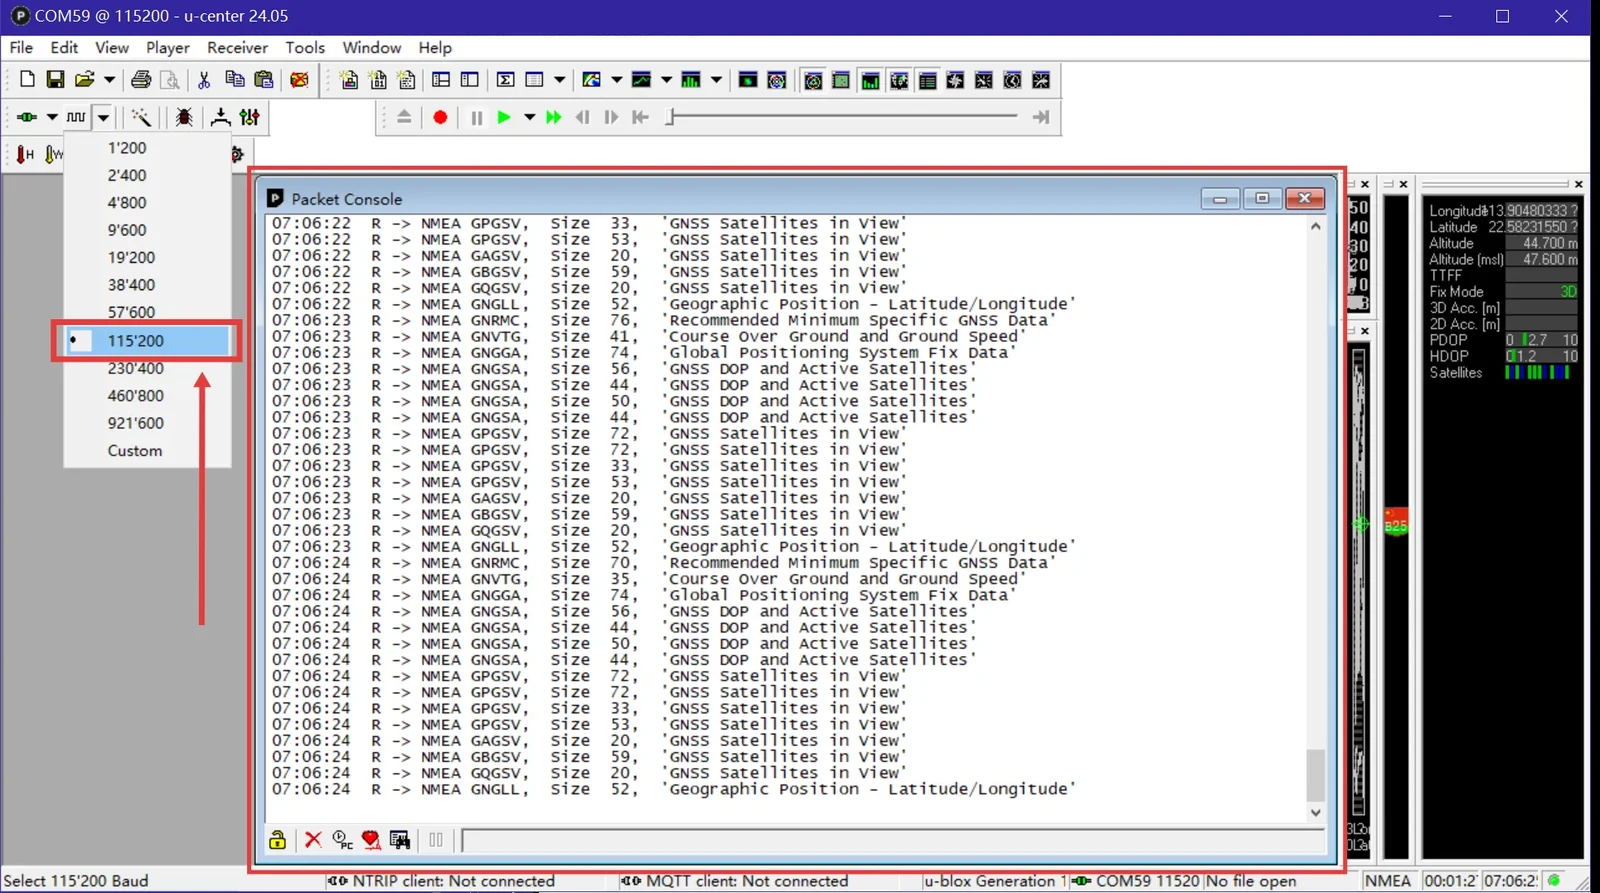
Data scrolling at 115200 after a full power cycle means the change is saved. Fit the module to the aircraft.
Easily confused points
Baud rate lives in the module, not the flight controller. This is the whole reason the problem exists: swapping the module to another aircraft carries the old setting along with it.
Applying and saving are two separate actions. The Ports page applies; the CFG page saves. Both are needed, in that order.
Losing the connection after Send is success, not failure. It means the module changed rate.
Autobauding is for finding, not for setting. Turn it off before changing anything, and do not rely on it for the final verification — it will connect happily at the wrong rate and hide a failed save.
Betaflight's 115200 ceiling is a real limit. No configurator setting works around it; the module has to be brought down to meet it.
ArduPilot will do this again. Left on automatic configuration, ArduPilot may raise the rate the next time the module is fitted to an ArduPilot aircraft. That is normal and good for ArduPilot — just expect to repeat this procedure if the module later moves back to Betaflight.
Troubleshooting
| Symptom | What to check |
|---|---|
| No COM port in Device Manager | Driver not installed, or a charge-only USB cable. |
| u-center connects but no data | The data pair is not crossed — adapter TXD to module RX, adapter RXD to module TX. |
| Autobauding finds nothing | Check 5 V is actually reaching the module, and that both ends share a ground. |
| Rate reverts after a power cycle | The CFG save step was missed, or not all device entries 0–4 were selected. |
| Connection drops right after Send | Expected. Change the toolbar rate to the new value. |
| Betaflight still cannot see it | Confirm the saved rate really is 115200 with a cold start, then check the port assignment and GPS feature in the configurator. |
Related guides
- GPS Module User Manual — including the factory baud rates of each model
- Drone GPS & Compass Guide — mounting, wiring and per-firmware setup
- External Compass Orientation
- CP2102 Driver Installation (Windows)
Written and maintained by the Robofusion engineering team.