Flight Controller Firmware Flashing Guide
A flight controller is a small computer with no fixed personality: the same board can be an ArduPilot autopilot flying GPS missions today and a Betaflight racing quad tomorrow. What decides which one it is, is the firmware you write into it.
This guide covers flashing all four major open-source firmwares — ArduPilot, PX4, INAV and Betaflight — onto an STM32-based flight controller, and more importantly why the procedure differs between them. If you have ever wondered why one file is called .apj and another _with_bl.hex, why some updates need a button held down and others don't, or how to recover a board that no longer boots at all, this is the page for that.
Everything here applies to the boards we sell — the H743 V2, F405 V2 and NxtPX4 V2 — and to STM32 flight controllers in general.
What you are actually doing
Three pieces of software live on a flight controller, and understanding the difference between them makes every flashing problem easier to diagnose.
- DFU — Device Firmware Update, a tiny flashing routine burned into the STM32 chip's read-only memory at the factory. It cannot be erased, overwritten or corrupted by anything you flash. This is the safety net: a board with no firmware, or with completely broken firmware, can still be recovered through DFU.
- The bootloader — a small program at the very start of the writable flash. Its job is to run at power-up, check whether a ground station is asking to load new firmware, and hand over to the flight firmware if not. Each firmware family has its own bootloader — ArduPilot's is not PX4's.
- The flight firmware — the actual autopilot: ArduPilot, PX4, INAV or Betaflight.
Once a board has the right bootloader, updating firmware is trivial: connect a ground station over USB and it does the rest. Getting the first bootloader on, or swapping to a different firmware family, is the part that needs DFU.
Because DFU lives in ROM, the recovery path never goes away. A board that shows no COM port, no LEDs and no signs of life over USB will still usually enumerate as a DFU device when you hold BOOT while plugging it in. Assume a board is recoverable until DFU itself fails to appear.
Which file do I flash?
This is the question that trips up most first-time flashers, and it has a clean answer: look at the file extension, and ask whether it contains a bootloader.

In words:
| File | Firmware | Contains a bootloader | Flash it with | Needs DFU |
|---|---|---|---|---|
*_with_bl.hex | ArduPilot | Yes — bootloader + firmware | STM32CubeProgrammer, MicoConfigurator, INAV Configurator | Yes |
*.apj | ArduPilot | No — firmware only | Mission Planner, MicoConfigurator | No |
*.px4 | PX4 | No — firmware only | QGroundControl, MicoConfigurator | No |
*_bootloader.elf | PX4 | Bootloader only | STM32CubeProgrammer | Yes |
The pattern: a file with a bootloader in it goes on over DFU; a file without one is handed to the bootloader that is already on the board. Betaflight and INAV hide this distinction — their configurators handle DFU and the bootloader for you — which is why flashing those two feels simpler.
Choose your route
There are two ways to do everything below.
MicoConfigurator runs in Chrome or Edge with nothing to install, on Windows, macOS and Linux. It can flash ArduPilot and PX4 normally, and all four firmwares over DFU — which means you do not need STM32CubeProgrammer at all. For most people, this is the route to take.

The traditional tools — Mission Planner, QGroundControl, the Betaflight and INAV configurators, plus STM32CubeProgrammer for DFU work — do the same jobs and are worth knowing, because every guide and forum post you will ever read assumes them.
| Tool | What it is for | Where to get it |
|---|---|---|
| MicoConfigurator | ArduPilot/PX4 flashing and DFU flashing, in a browser | micoair.com/configurator |
| Zadig | Installs the Windows DFU driver | zadig.akeo.ie |
| STM32CubeProgrammer | ST's own DFU flashing tool | st.com |
| Mission Planner | ArduPilot ground station and flashing | ardupilot.org |
| QGroundControl | PX4 ground station and flashing | qgroundcontrol.com |
| Betaflight Configurator | Betaflight setup and flashing | GitHub releases |
| INAV Configurator | INAV setup and flashing | GitHub releases |
Many USB-C cables are charge-only. A charge-only cable gives you a board that powers up and is completely invisible to the computer — no COM port, no DFU device, no error message. If anything below fails at the very first step, change the cable before changing anything else.
Where to download firmware
- ArduPilot — official builds at firmware.ardupilot.org. Pick your vehicle type, then your board's exact target name. To enable optional features, build your own at the Custom Firmware Builder.
- PX4 — official releases on GitHub, or build from source.
- INAV and Betaflight — easiest through their configurators, which download the right build for the target you select.
Board support arrived in specific versions, and older firmware simply will not list your board:
| Board | ArduPilot from | PX4 from | INAV from |
|---|---|---|---|
| MicoAir H743 V2 | 4.6.0 | 1.16.0 | 8.0.0 |
| MicoAir F405 V2 | 4.5.0 | not supported | 8.0.0 |
| NxtPX4 V2 | 4.6.0 | native target hkust_nxt-dual | not supported |
Board families use names that differ by one character — MicoAir743, MicoAir743v2, MicoAir743-Lite, MicoAir743v2-AIO. They are different boards with different pin maps. Firmware for the wrong one will usually flash and boot, and then put motors, GPS and battery sensing on the wrong pins. Read the target name character by character before you flash it.
Entering DFU mode
Needed whenever you are installing a bootloader: first-time setup, switching firmware families, or recovering a board that will not start.
- Disconnect everything — USB cable and flight battery.
- Hold the BOOT button next to the USB connector.
- Keep holding it and plug in the USB-C cable.
- Release about two seconds after the board powers up.
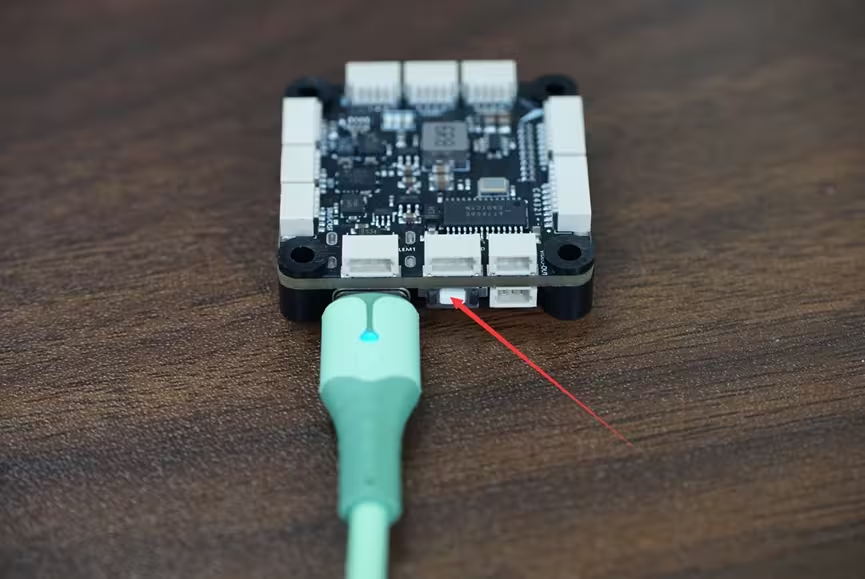
Check it worked in Windows Device Manager:

A board in DFU mode shows no COM port and no lit status LEDs. That is exactly right — it is not running firmware, so there is nothing to light them.
Installing the DFU driver (Windows)
Windows needs a WinUSB driver before flashing tools can talk to the DFU device. Do this once per computer. Skip it if Device Manager already shows DFU in FS Mode and your tool connects.
-
Put the board in DFU mode and open Zadig.
-
Open Options and tick List All Devices.
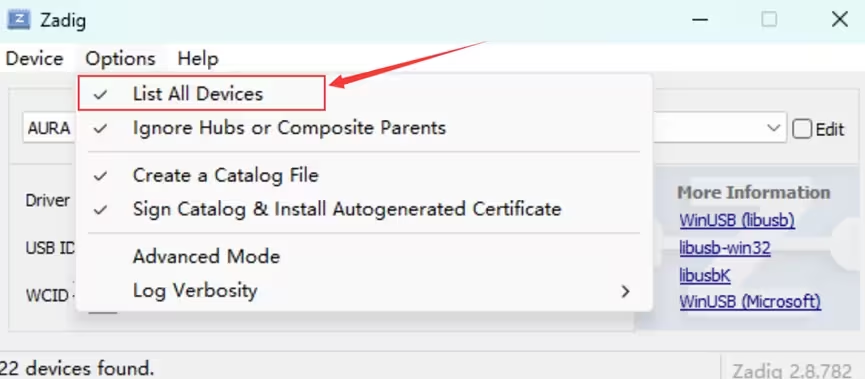
-
In the dropdown, select DFU in FS Mode (or STM32 BOOTLOADER on an STM32F405 board).
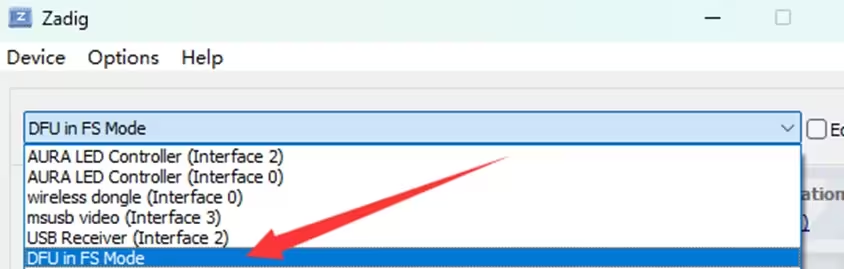
-
Choose WinUSB as the driver and click Install Driver (or Replace Driver).
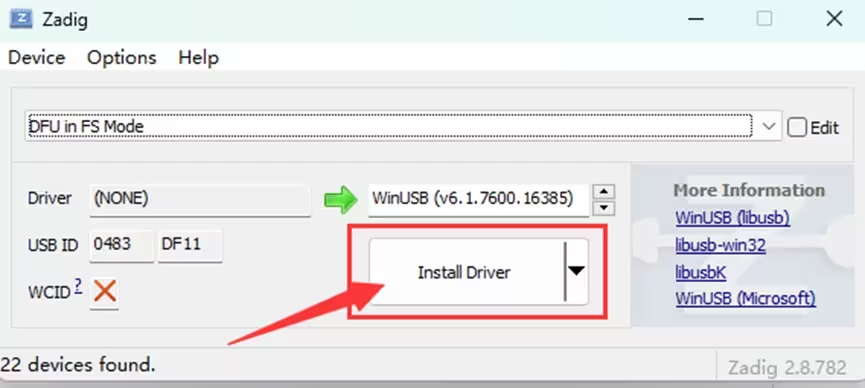
-
Unplug and replug the board, then connect from your flashing tool.
Zadig lists every USB device on the machine, and it will happily replace the driver on the wrong one. Make sure the selected entry is the DFU device. If you replace the driver on the board's normal serial device by mistake, Windows stops showing it as a COM port and shows it by name instead — the fix is to use Zadig again to put that device back on USB Serial.
ArduPilot
Which procedure you need depends entirely on what is on the board now.
If the board already runs ArduPilot
The bootloader is there, so this is a plain update — no button, no driver, about ten seconds.
With MicoConfigurator: connect the board over USB, open Firmware Upgrade, and choose Online Upgrade to pick a vehicle type and version, or Local Upgrade to supply an .apj file yourself. Click flash and wait for the board to reboot.
With Mission Planner: disconnect the board first, open Install Firmware, click Load custom firmware and choose your .apj file.
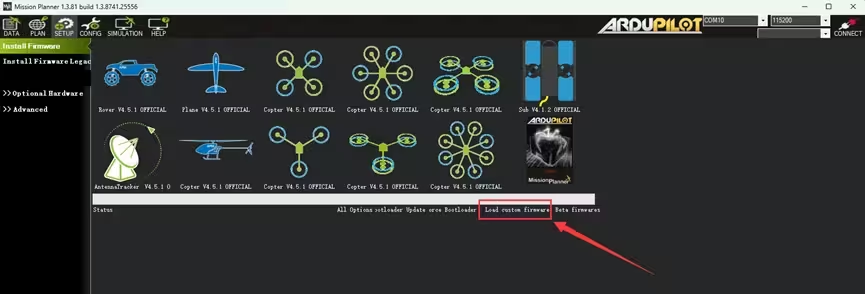
Mission Planner then asks you to connect the board. Click OK, plug in the USB cable, and it detects the board and writes the firmware.
If the board is blank or runs something else
You need a file that carries its own bootloader: *_with_bl.hex, flashed over DFU. This one takes a few minutes rather than a few seconds.
With MicoConfigurator: put the board in DFU mode, open Firmware Upgrade → DFU Flash, load the file, pick the DFU device in the browser's device prompt, and flash.
With STM32CubeProgrammer:
-
Put the board in DFU mode and open STM32CubeProgrammer.
-
Select USB as the connection type at the top right, click the refresh button —
USB1should appear — and click Connect.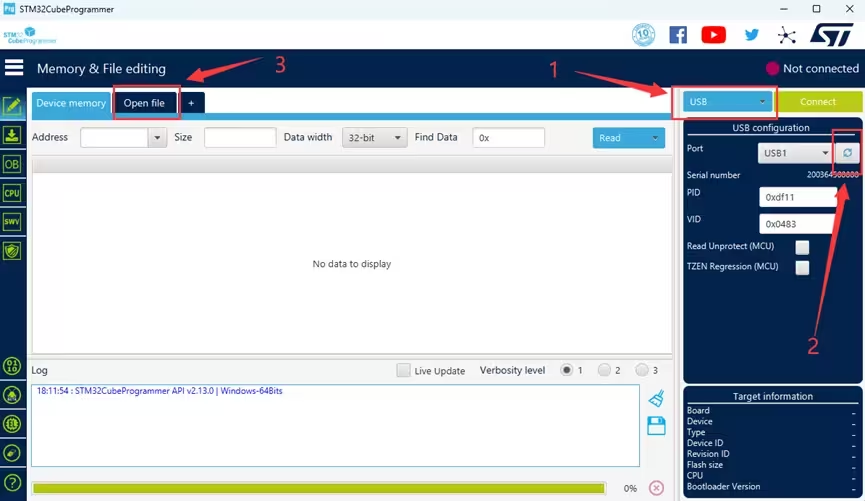
-
Click Open file, choose the
_with_bl.hexfile, and click Download.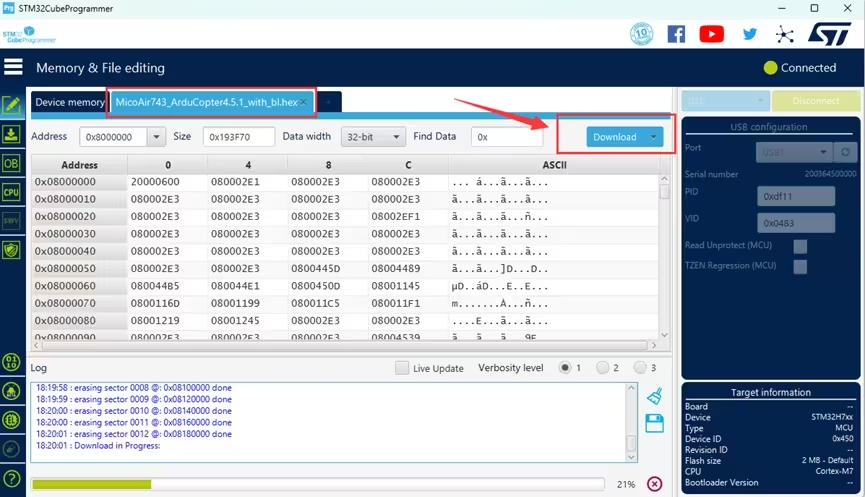
-
Wait for it to finish — several minutes is normal.
After flashing an ArduPilot .hex file, power the board off and on twice before trying to connect. The first boot finishes setting itself up, and connecting during it is the usual reason a freshly flashed board appears dead.
PX4
If the board is not already running PX4, it needs the PX4 bootloader first.
-
Flash the bootloader. Put the board in DFU mode and connect STM32CubeProgrammer as above. On a first PX4 install, click the erase button at the bottom left to clear the whole flash first. Then Open file, select the
*_bootloader.elf(orbootloader.bin), and click Download — it is small and takes a second or two.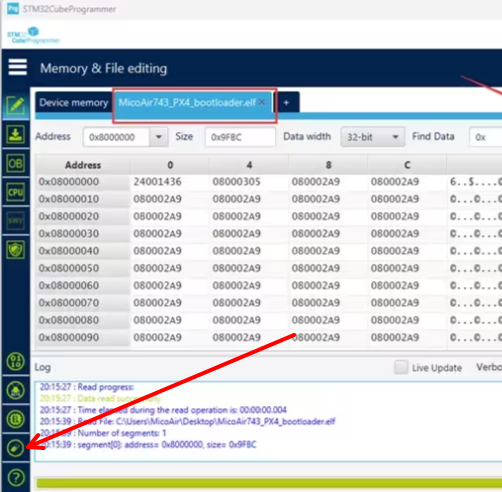
Keep the file path free of non-ASCII characters;
.elfloading fails on paths the tool cannot parse. Disconnect USB when it finishes. -
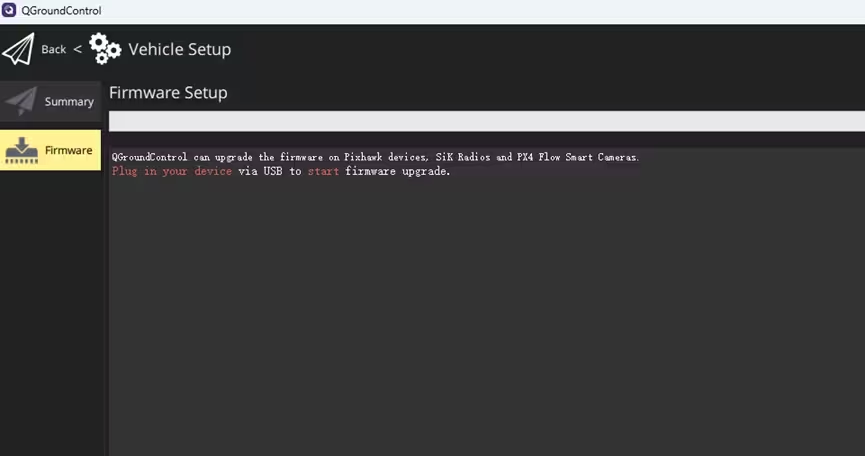
Flash the firmware with QGroundControl. Open QGC and go to the Firmware page, then plug the board in when prompted — no BOOT button this time, the bootloader handles it.
-
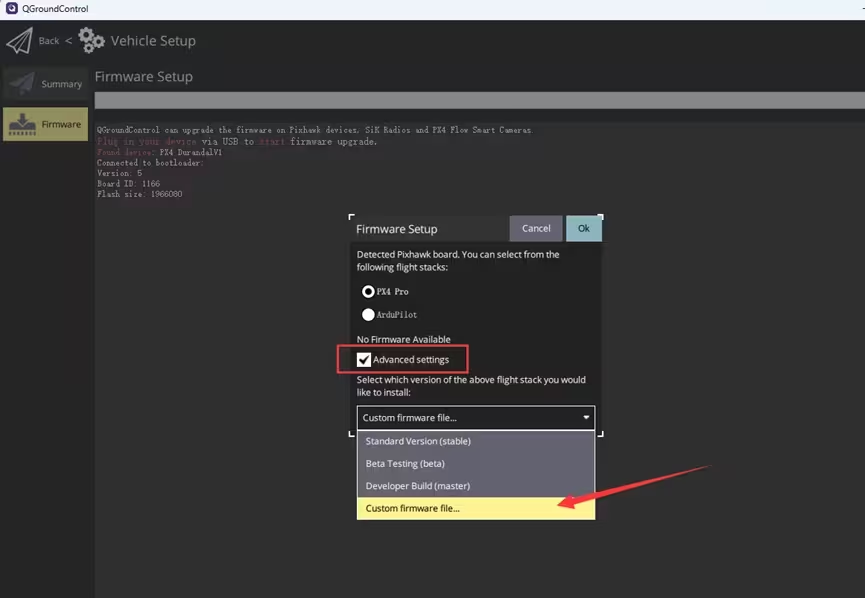
When QGC detects the board, tick Advanced settings, choose Custom firmware file from the dropdown, and click OK.
-
Pick your
.px4file. Flashing takes about ten seconds, after which the board reboots and QGC reconnects on its own.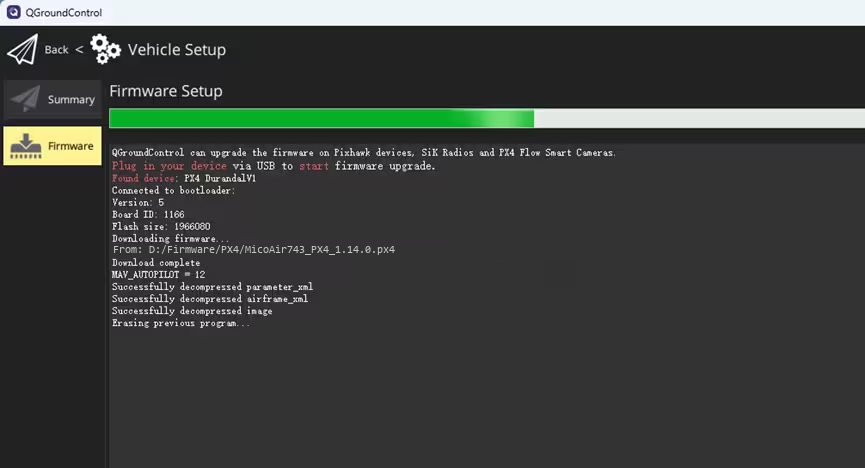
MicoConfigurator can do steps 2–4 through Local Upgrade if you prefer to stay in one tool.
INAV
INAV Configurator handles DFU and the bootloader itself, so there is no separate bootloader step.
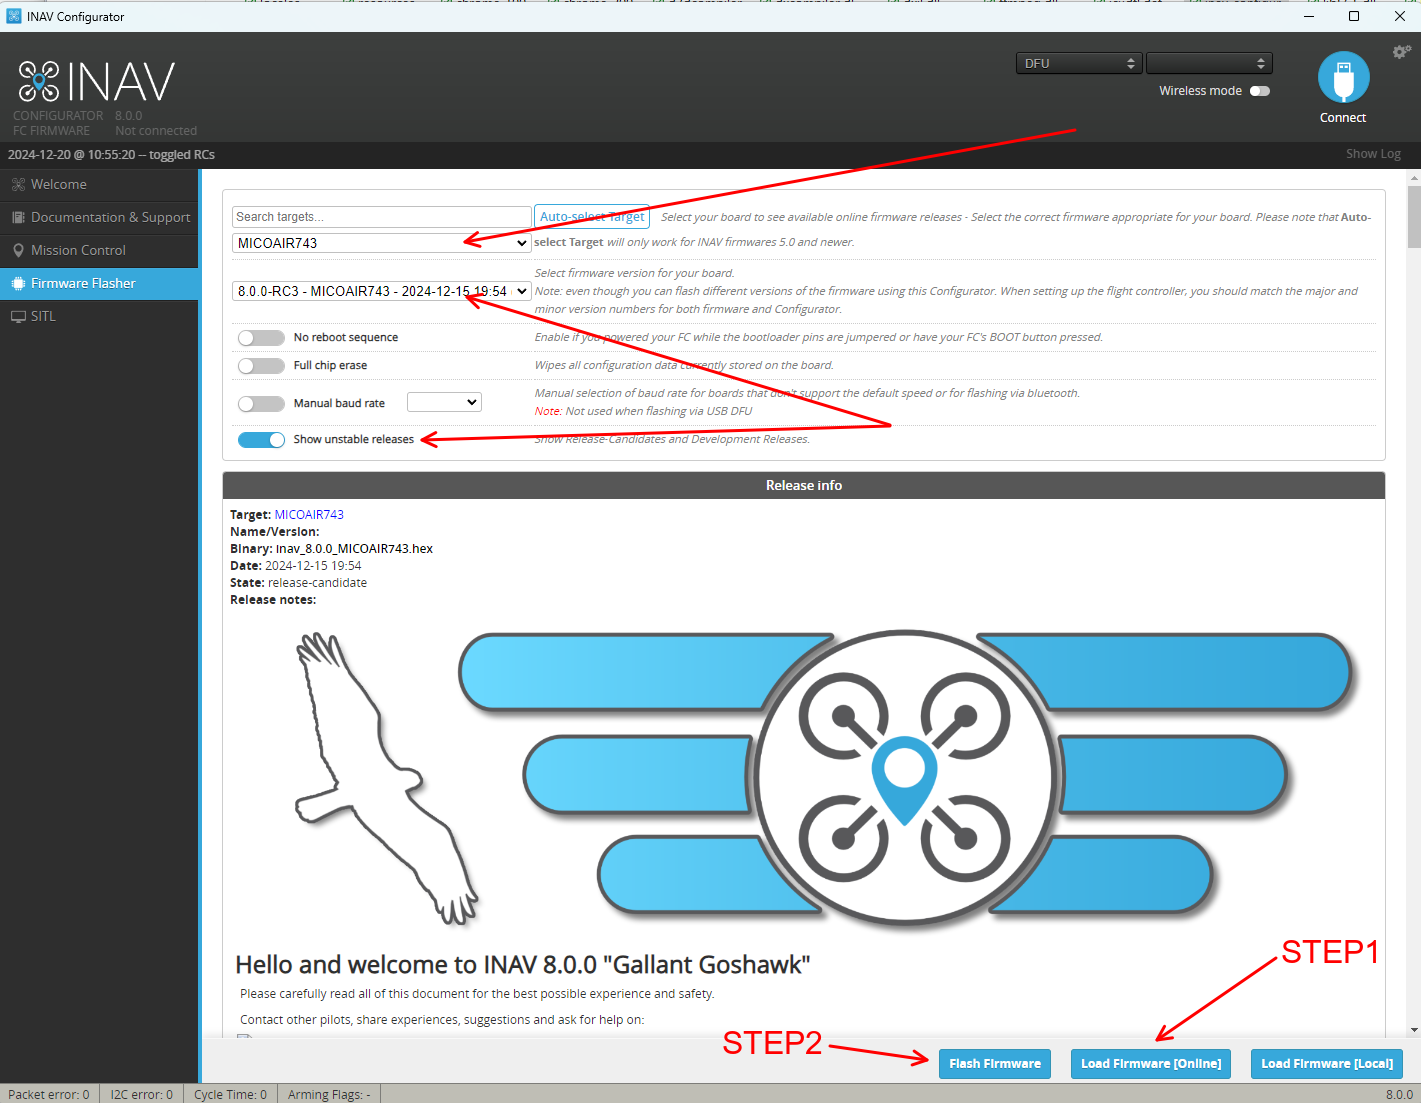
- Put the board in DFU mode and open INAV Configurator — the top right should read DFU.
- Open the Firmware Flasher page.
- Select your board target at the top left and the version you want.
- Click Load Firmware [Online], or Load Firmware [Local] for a file you already have.
- Click Flash Firmware.
A long-standing microSD card detection problem was fixed in 8.0 RC3. Use that or newer, with a matching 8.0 configurator.
Betaflight
Same idea, in Betaflight Configurator.
- Put the board in DFU mode and open Betaflight Configurator — the top right should read DFU - DFU in FS Mode.
- Choose your board from the target list.
- Click Load Firmware [Online] to download it, or Load Firmware [Local] to pick a file.
- Click Flash Firmware.
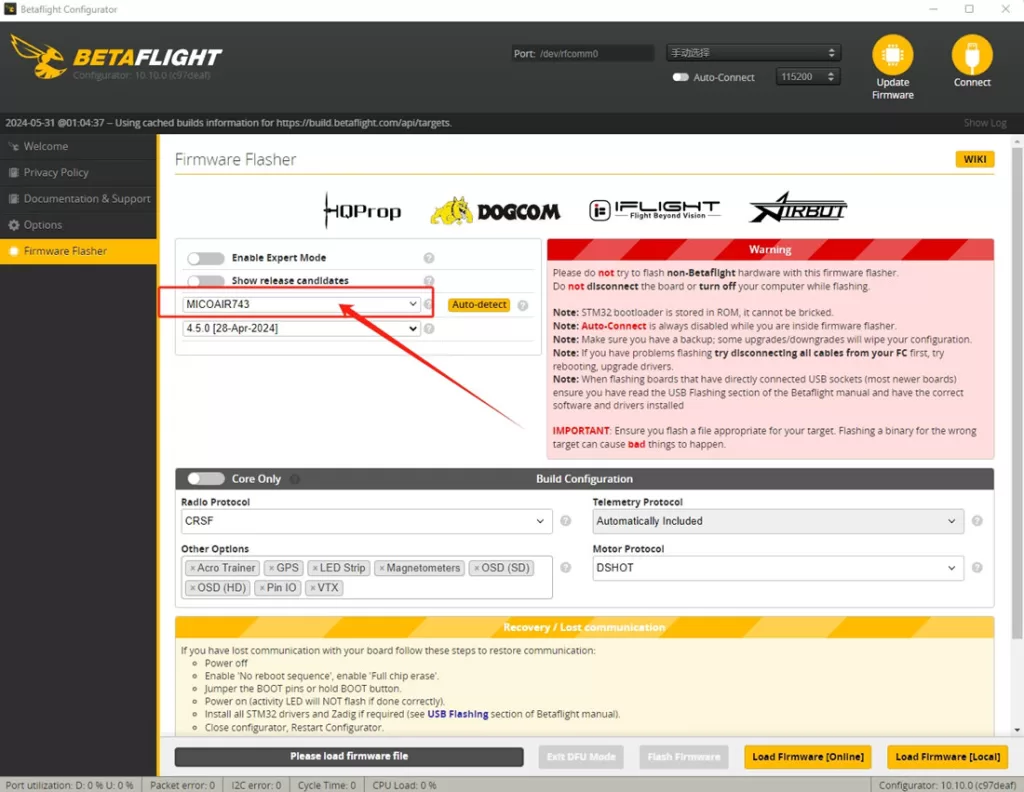
Easily confused points
DFU mode and the bootloader are not the same thing. DFU is in the chip's ROM and is always there. The bootloader is in flash, belongs to one firmware family, and has to be installed. That is why moving from Betaflight to ArduPilot needs DFU, while updating ArduPilot to a newer ArduPilot does not.
_with_bl.hex is used once; .apj is used forever after. The hex file exists to get a bootloader onto the board. Once it is there, use .apj — it is faster, needs no button and no driver.
"The board isn't detected" usually means the cable. Charge-only USB-C cables are extremely common and fail silently. Rule them out first, every time.
DFU mode looks like a dead board. No COM port, no LEDs. People frequently conclude the board is broken at precisely the moment it is working correctly.
Zadig changes drivers, not just for DFU. Pointed at the wrong device it will remove your board's COM port. If a board that used to appear as a COM port now appears under its own name, Zadig is the cause and also the fix.
Nearly identical target names are different boards. MicoAir743 and MicoAir743v2 are not interchangeable, and neither will tell you that you have chosen wrong — the board just behaves strangely afterwards.
MicoConfigurator only connects to ArduPilot and PX4. A board running Betaflight or INAV will not show up as a serial port in it. That is expected, not a fault — use DFU mode, or the relevant configurator.
Troubleshooting
The board will not enter DFU mode
- Swap the USB-C cable for one you know carries data.
- Try a different USB port, directly on the computer rather than through a hub.
- Make sure BOOT was held down before the cable went in, and stayed held for about two seconds after.
- Inspect the connector pins on the board — a bent or shorted pin can stop enumeration. Straighten carefully with tweezers.
- If the board does not light up on USB at all, stop applying power and treat it as a hardware fault. Repeatedly powering a board with a damaged regulator or MCU makes things worse.
The flashing tool cannot see the DFU device
- Confirm Device Manager shows
DFU in FS ModeorSTM32 BOOTLOADER. - If it is there but the tool cannot connect, the WinUSB driver is probably missing — run Zadig.
- Close anything else that might be holding the device: another configurator, another browser tab.
- Refresh the page or restart the tool, and re-authorise the device when prompted.
Zadig does not list the DFU device
- Confirm the board really is in DFU mode. A damaged BOOT button or a loose USB socket will prevent it.
- Check Options → List All Devices is ticked.
- Look in Device Manager for an "unknown USB device" — that is the same board, unrecognised.
The board will not start after flashing
- Wrong target. This is the most likely cause. Re-flash with firmware built for your exact board.
- After an ArduPilot
.hexflash, power-cycle twice before connecting. - Remove the microSD card and try again — a failing card can block startup.
- Recovering is always the same move: hold BOOT, plug in USB, flash the correct file.
MicoConfigurator cannot find the board's serial port
- It connects only to boards running ArduPilot or PX4.
- Check the cable and try another USB port.
- Close other software or browser tabs that may hold the port open.
- Re-authorise serial access when the browser asks.
Related guides
- MicoAir H743 V2 — User Manual
- MicoAir F405 V2 — User Manual
- NxtPX4 V2 — User Manual
- ArduPilot — Telemetry Setup Guide
- PX4 — Telemetry Setup Guide
Where to buy
Flight controllers that run all four firmwares, shipped from Canada with free Canada-wide shipping:
- MicoAir H743 V2 — the do-it-all flagship
- MicoAir F405 V2 — budget ArduPilot / INAV builds
- NxtPX4 V2 — 20 × 20 mm PX4 research board
Written and maintained by the Robofusion engineering team.