Configuring Open-Source ESC Parameters
Modern ESCs are small computers with settings of their own — motor direction, timing, braking, startup behaviour, protection limits. Changing them is worth knowing how to do, and it is less obvious than it looks, because an ESC has no USB port.
How the computer reaches the ESC
The flight controller does the relaying. It is not configuring anything itself — it just passes bytes between the computer and the four ESCs.

The protocol for that last hop is 4way-if, a single-wire serial protocol from the BLHeli project. It reuses the motor signal wire in both directions, which is why configuring an ESC needs no extra cabling — and also why it only works with ESC firmware that implements it: BLHeli_S, BLHeli_32, Bluejay and AM32.
Two ways to get a bridge
If your board runs ArduPilot, you do not need to reflash it. ArduPilot has BLHeli passthrough built in:
- Set
SERVO_BLH_AUTO = 1— this enables passthrough for all multicopter motor outputs. - Reboot the flight controller.
- Open Mission Planner → Setup → Optional Hardware → BLHeli ESC Configurator.
That is the shortest path for an ArduPilot aircraft, and it covers the settings most people want. For AM32-specific settings and for firmware updates, use the dedicated AM32 configurator, which needs the Betaflight route below.
If you want the browser configurators, the board needs to be running Betaflight or INAV, because those tools speak Betaflight's protocol.
- Betaflight — nothing to configure; passthrough works out of the box.
- INAV — enable motor output first. It is disabled by default, and with it disabled the configurator will not find the ESCs.
Flashing between firmwares: Firmware Flashing Guide.
Remove the propellers before you connect. Motors can and do spin during configuration, during a motor test, and at the end of a firmware flash.
Wiring up
On an AIO board (flight controller and ESC on one board): just the USB cable — plus the battery, see below.
On a separate flight controller and 4-in-1 ESC: connect the ESC to the flight controller first, power the ESC from the flight battery, then plug USB into the flight controller.
USB powers the flight controller. It does not power the ESCs. Without the flight battery connected the configurator will connect to the flight controller happily and then find no ESCs — which reads as "the tool doesn't work" rather than "nothing is powered".
Connect with a browser configurator
Two tools, both running entirely in the browser:
| Tool | Firmware it handles | Use it for |
|---|---|---|
| esc-configurator.com | BLHeli_S, Bluejay, AM32 | Most ESCs, including our Bluejay 4-in-1 |
| am32.ca/configurator | AM32 only | AM32 boards, and AM32 firmware updates |
Both need a Chromium-based browser — Chrome or Edge. They use WebUSB, which Firefox and Safari do not implement.
-
Open the tool.
-
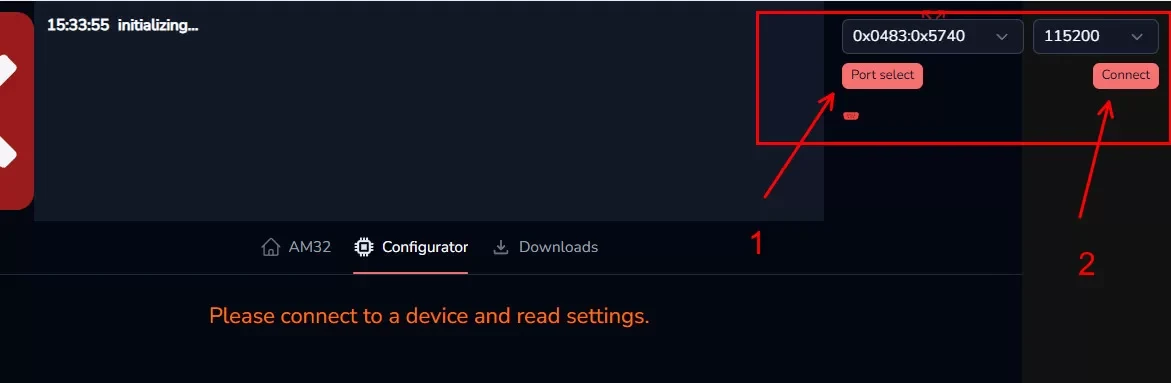
Click Port select at the top right, choose the flight controller's port, and click Connect.
-
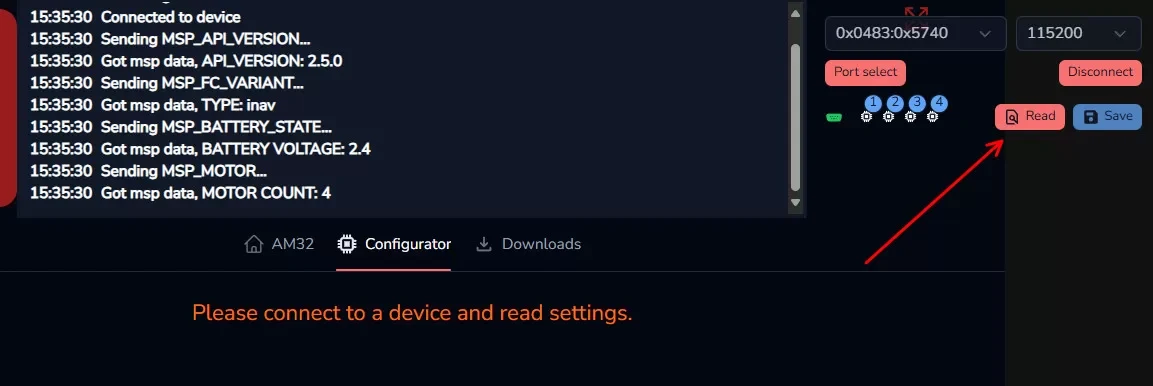
Click Read. The tool reads all four ESCs.
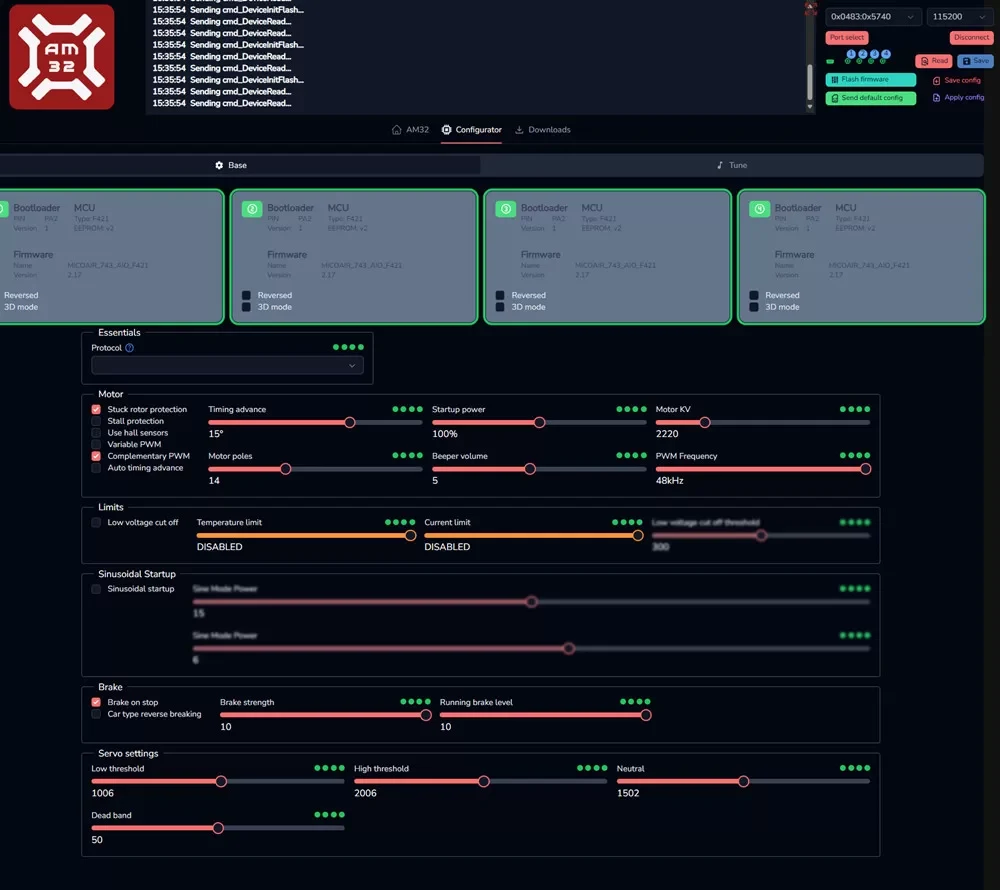
You should now see four panels, one per ESC.
Changing settings
Selection matters more than it looks. The panel border tells you the state:
| Border | Meaning |
|---|---|
| Grey | Not selected — changes will not be written to this ESC |
| Green | Selected, nothing changed |
| Red | Selected, changed but not yet saved |
Click the panels to select the ESCs you want to change — usually all four.
Motor direction. Tick or untick Reversed for the ESC concerned. Do it here rather than by swapping two motor wires: the electrical result is identical, but a software setting is visible to whoever opens the configuration next, and a swapped pair of wires is not.
Motor KV. Set it to match the motors you actually fitted. This value feeds the ESC's timing behaviour, and a figure a long way from reality can leave the ESC unable to drive the motor cleanly.
Save. With the ESCs still selected, click Save. This is the step people miss: settings changed on screen but never written are simply discarded when you disconnect, and the red border is the only warning you get.
Flashing ESC firmware
Firmware updates go through the same connection.
- Click Flash Firmware.
- Choose the version — the latest release is normally the right answer.
- Choose which ESCs to flash. Usually select all four.
- Click Start flash and wait. Four ESCs take tens of seconds.
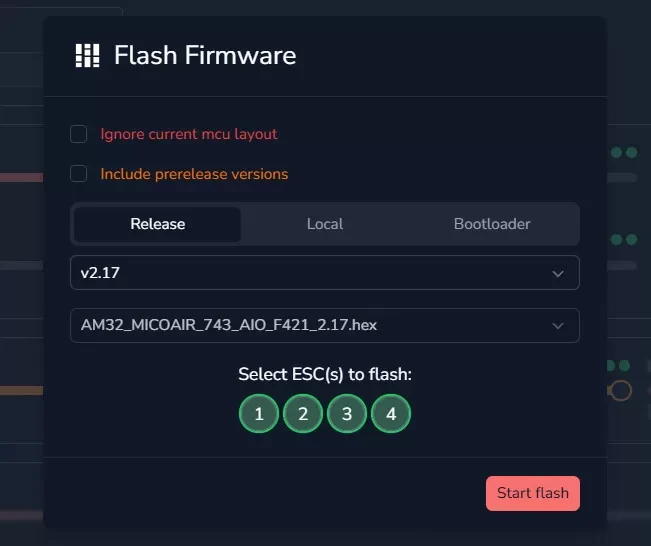
The target firmware file is normally detected automatically from the ESC; check it against the manual if you are selecting one by hand.
Losing power or unplugging USB mid-flash bricks the ESC. Unlike a flight controller, an ESC has no ROM bootloader to fall back on — recovery needs a hardware programmer connected to the board, which in practice means sending it back. Use a charged battery, leave the cable alone, and wait for the tool to report that it has finished.
Easily confused points
The flight controller is a bridge, not a participant. Its firmware matters only because it decides whether passthrough is available — it does not store or apply any ESC setting.
USB power is not ESC power. Connect the flight battery.
"Not selected" looks a lot like "selected". Grey versus green borders. Changes to unselected ESCs go nowhere.
Changing is not saving. Red border means unsaved. Click Save.
ArduPilot users do not have to reflash. SERVO_BLH_AUTO = 1 plus Mission Planner's BLHeli configurator handles most of it.
INAV hides the ESCs by default. Motor output is off until you enable it.
Bricking an ESC is permanent in a way bricking a flight controller is not. DFU saves flight controllers; there is no equivalent here.
Firefox and Safari cannot do this at all. WebUSB is a Chromium feature, not a browser preference you can change.
Troubleshooting
| Symptom | What to check |
|---|---|
| Tool connects, but finds no ESCs | Flight battery not connected; INAV motor output disabled; ESC ribbon not seated. |
| No port to select | USB cable is charge-only; another tool or browser tab holds the port; wrong browser. |
| Only some ESCs read | That channel's signal line — usually a solder joint on the ribbon connector or the ESC pad. |
| Settings do not stick | The ESCs were not selected when you clicked Save, or Save was never clicked. |
| Motor spins the wrong way after saving | Reversed was applied to a different ESC than you meant — check which panel you had selected. |
| Flash fails part-way | Power was interrupted. If the ESC no longer responds it needs a hardware programmer. |
Related guides
- MicoAir 4-in-1 Bluejay ESC — User Manual
- MicoAir 4-in-1 AM32 ESC — User Manual
- Firmware Flashing Guide — putting Betaflight or INAV on the flight controller
- F405 V2 Flight Controller — User Manual
- H743 V2 Flight Controller — User Manual
Written and maintained by the Robofusion engineering team.