Configure the LR900 915 MHz Radio with MicoAssistant
MicoAssistant is MicoAir's browser-based configuration tool for their telemetry radios and sensors. It runs entirely in Chrome or Edge — nothing to install — and lets you read and change every setting on an LR900 radio over USB. This guide explains what each parameter does, then gives copy-paste settings for the most common setups, from using the radio as a generic 915 MHz serial bridge to a full ArduPilot or PX4 telemetry link.
This is an independent guide written by Robofusion. It is not an official MicoAir document — as of this writing no official walkthrough exists in any language, so we wrote one.
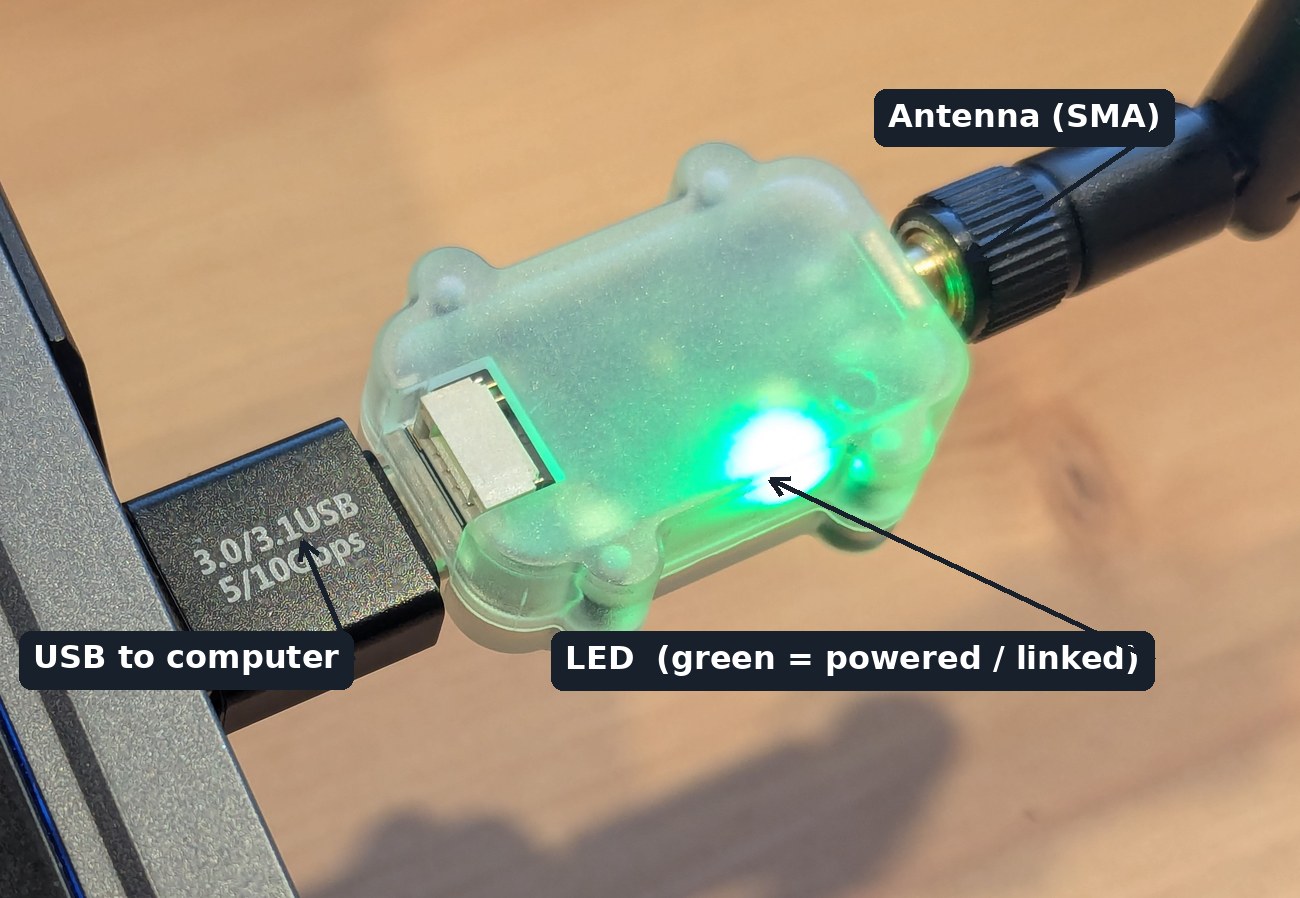
This guide is written for the LR900-F and LR900-P. They are used identically and differ only in transmit power (the -P is the higher-power version). The LR900-A works the same way in the tool, with two differences: it doesn't support FHSS frequency-hopping, and it uses the CH340 USB driver instead of the CP2102.
In a hurry? The 30-second version
For a normal ArduPilot or PX4 telemetry link, the factory defaults already work — you usually don't need this tool at all. Plug both radios in, and they pair automatically. Open MicoAssistant only when you want to change range, run several aircraft at once, or repurpose the radio.
| Parameter | Default | Leave it alone unless… |
|---|---|---|
| Work Mode | Duplex | …you're building a one-to-many RTK link |
| Speed Mode | High (2.1 KB/s) | …you need more range and can accept less data |
| TX Power | High | …you want to save power on a bench/indoor test |
| Freq Mode | Auto | …you want frequency-hopping or a fixed channel |
| Module Addr | 1000 | …you run more than one radio pair nearby |
| UART Baud | 57600 | …your flight controller uses a different baud |
Before you start
- A Chrome or Edge browser (MicoAssistant uses the Web Serial API; Firefox and Safari will not work).
- A USB-C cable to connect the radio to your computer.
- The USB driver installed — CP2102 for the LR900-F/P, CH340 for the LR900-A. If you've never connected the radio before, do this first: CP2102 Driver Installation (Windows).
- The radio itself — an LR900-F or LR900-P. (The configurator also supports the rest of the LR-series: LR24-F/P, LR900-A, LR868-F, TRS, MSTAR24.)
Step 1 — Connect the radio
Open MicoAssistant and go to the Overview tab.
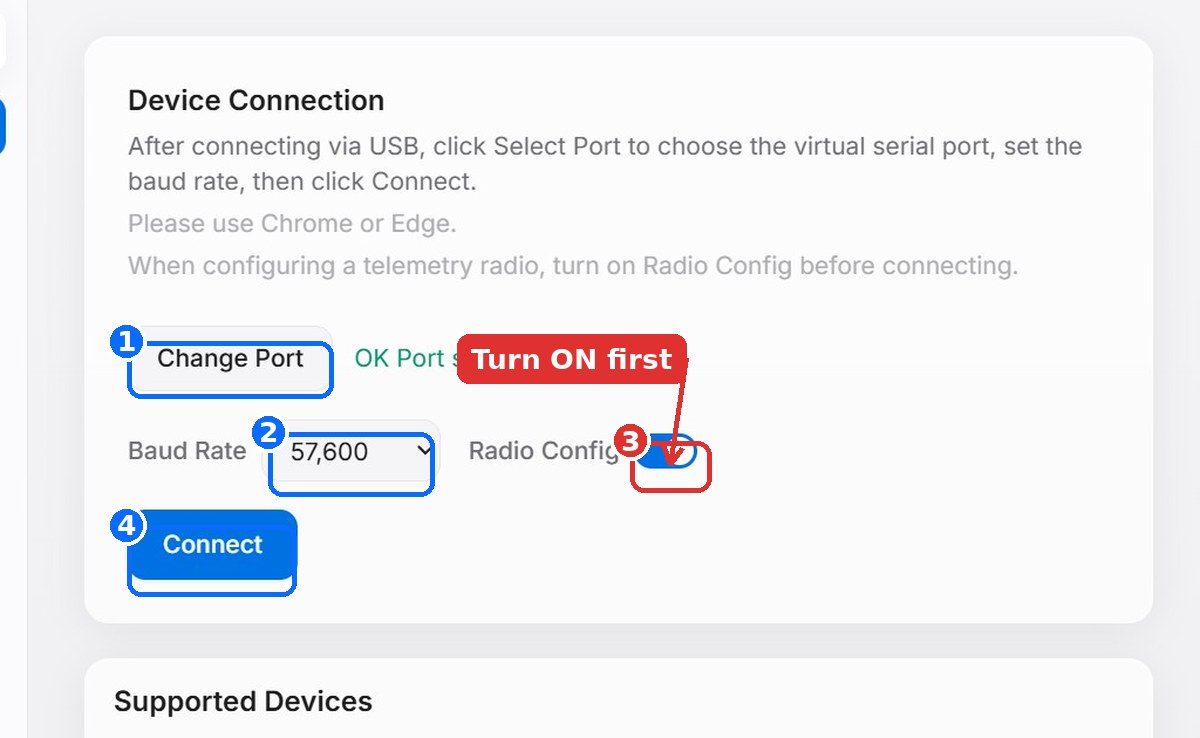
- Plug the radio into your computer with the USB-C cable.
- Turn on the
Radio Configtoggle. This is the single most important step — it tells the tool you're configuring a radio module, not reading a sensor. Switch it on before you connect. - Click Change Port and pick the radio's serial port (the CP210x / CH340 device). You'll see "OK Port selected" in green.
- Leave Baud Rate at
57,600(the radio's default USB baud). - Click Connect. The status dot at the top-left turns to a green Connected.
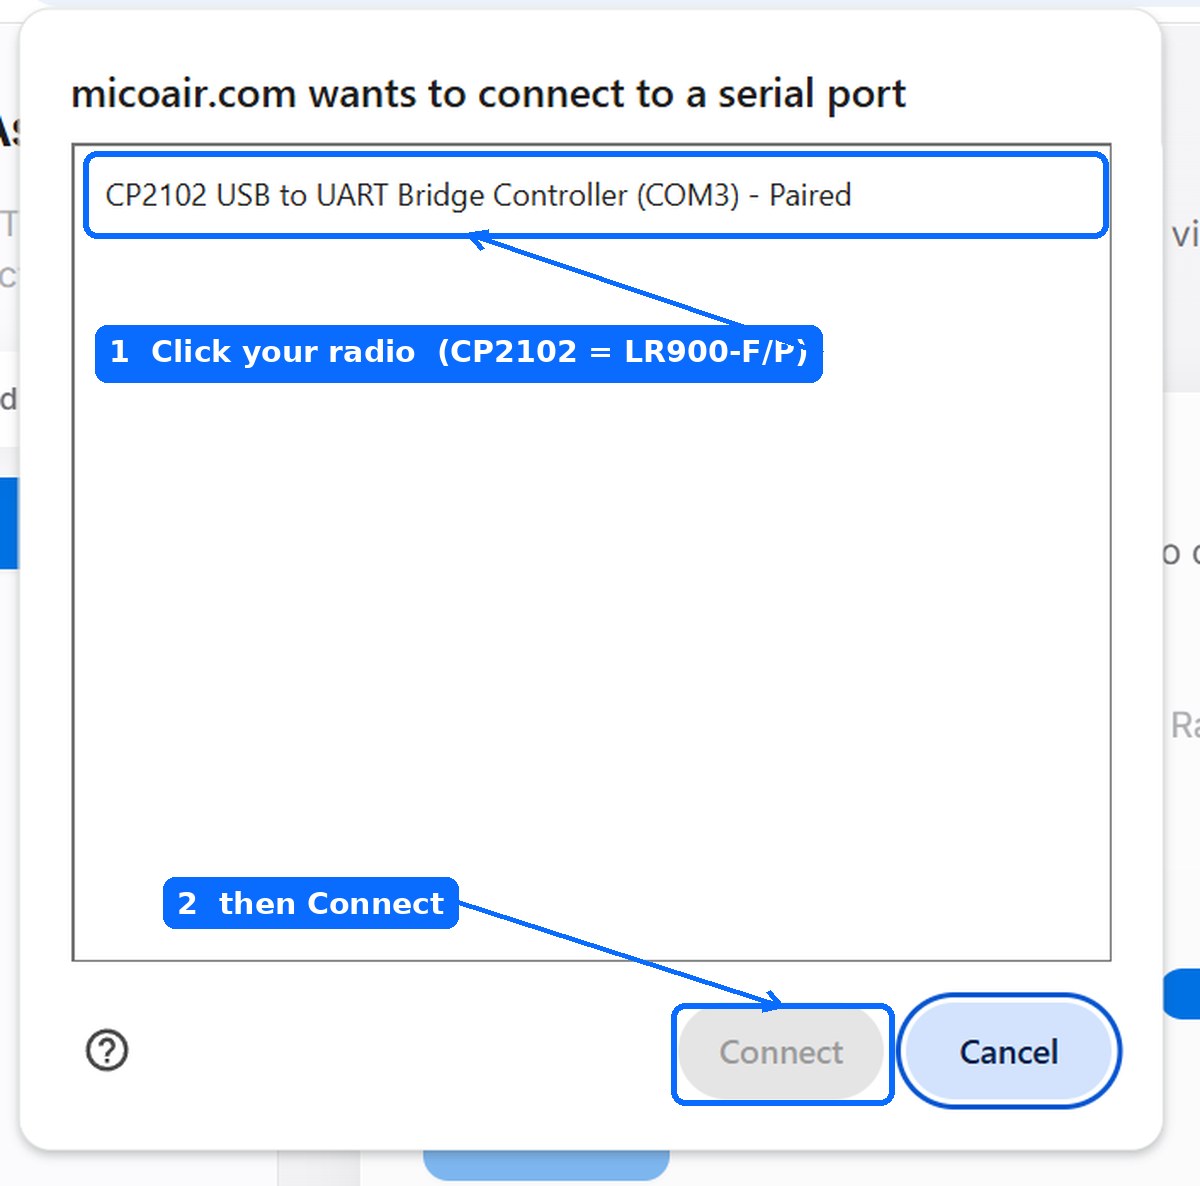
When you click Change Port, the browser shows its serial-port chooser. Pick the CP2102 (LR900-F/P) or CH340 (LR900-A) device, then confirm:
Connecting one radio at a time is fine. You'll configure the second radio of the pair the same way afterward.
Step 2 — Understand the parameters
Open the Params tab. You'll see the full parameter set for the radio, labelled Telemetry Radio – LR900. Each setting is a dropdown — here are all of them opened, so you can see every option at a glance:
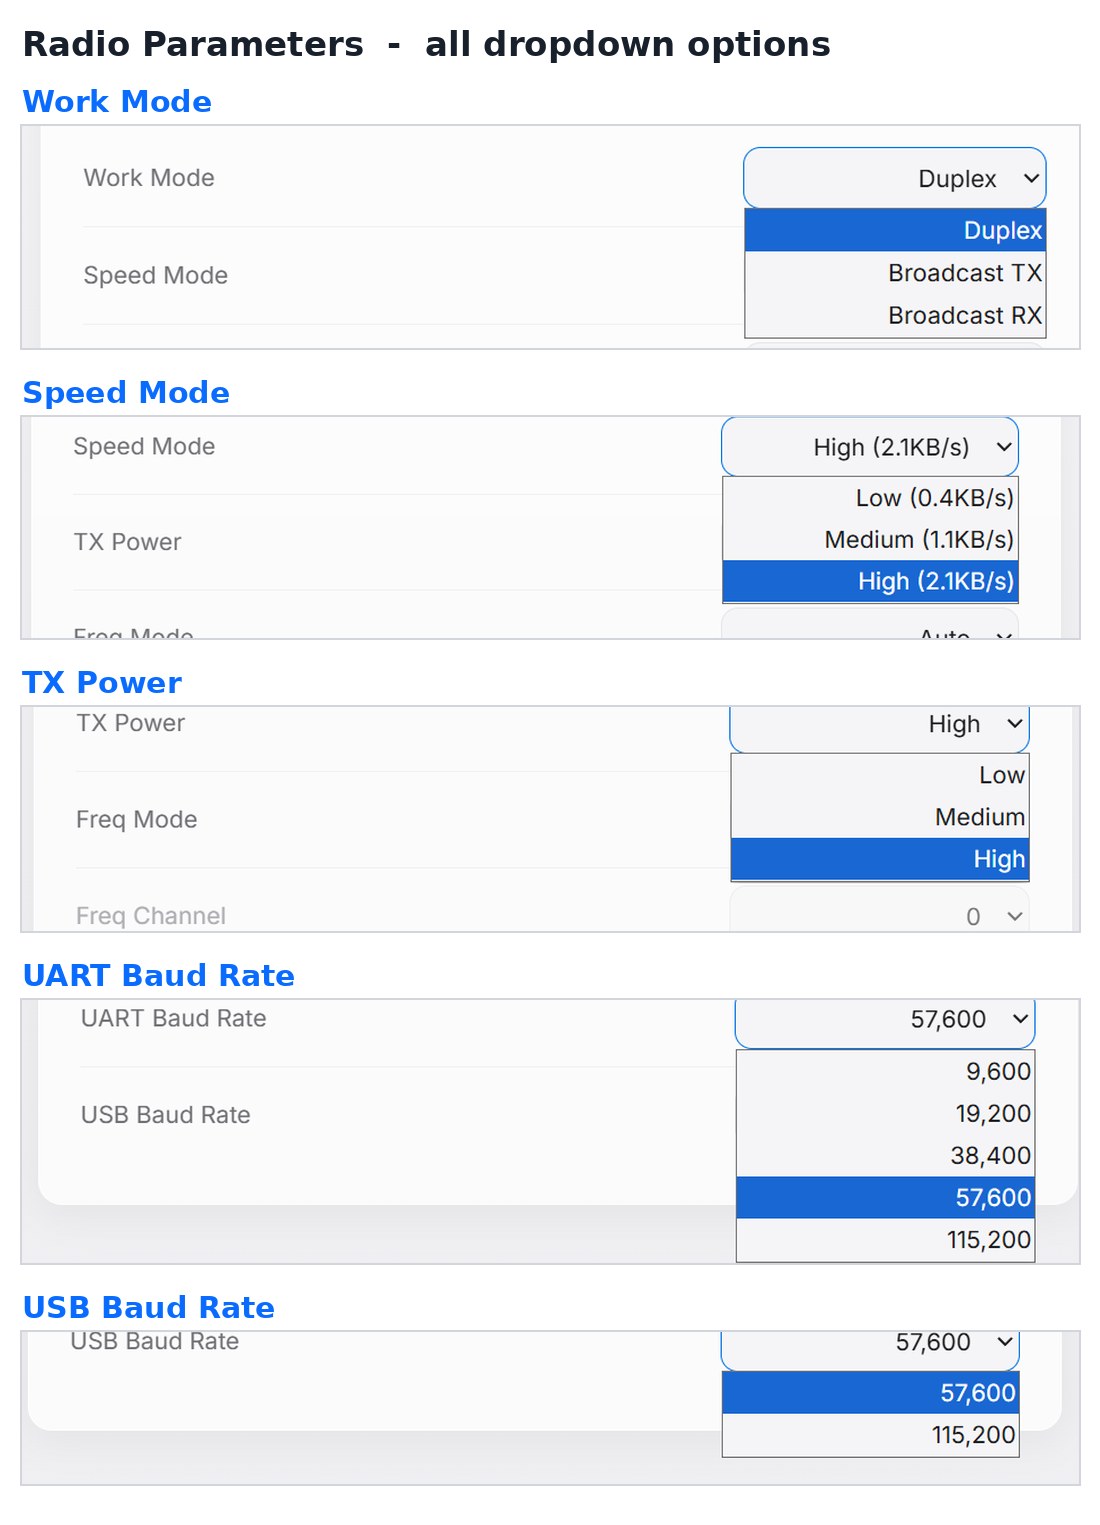
Here is what every setting does:
| Parameter | What it controls | Options | Default |
|---|---|---|---|
| Work Mode | The direction of data flow. Duplex is two-way (normal telemetry). The broadcast modes are one-way and are used for one-to-many links such as an RTK base feeding several rovers. | Duplex · Broadcast TX · Broadcast RX | Duplex |
| Speed Mode | The over-the-air data rate. Faster moves more data; slower reaches further. High is right for flight-controller telemetry. | Low (0.4 KB/s) · Medium (1.1 KB/s) · High (2.1 KB/s) | High |
| TX Power | Transmit power. Higher power means more range but more current draw. The actual maximum depends on the model (LR900-A ≈ 160 mW, F ≈ 500 mW, P ≈ 1000 mW). | Low · Medium · High | High |
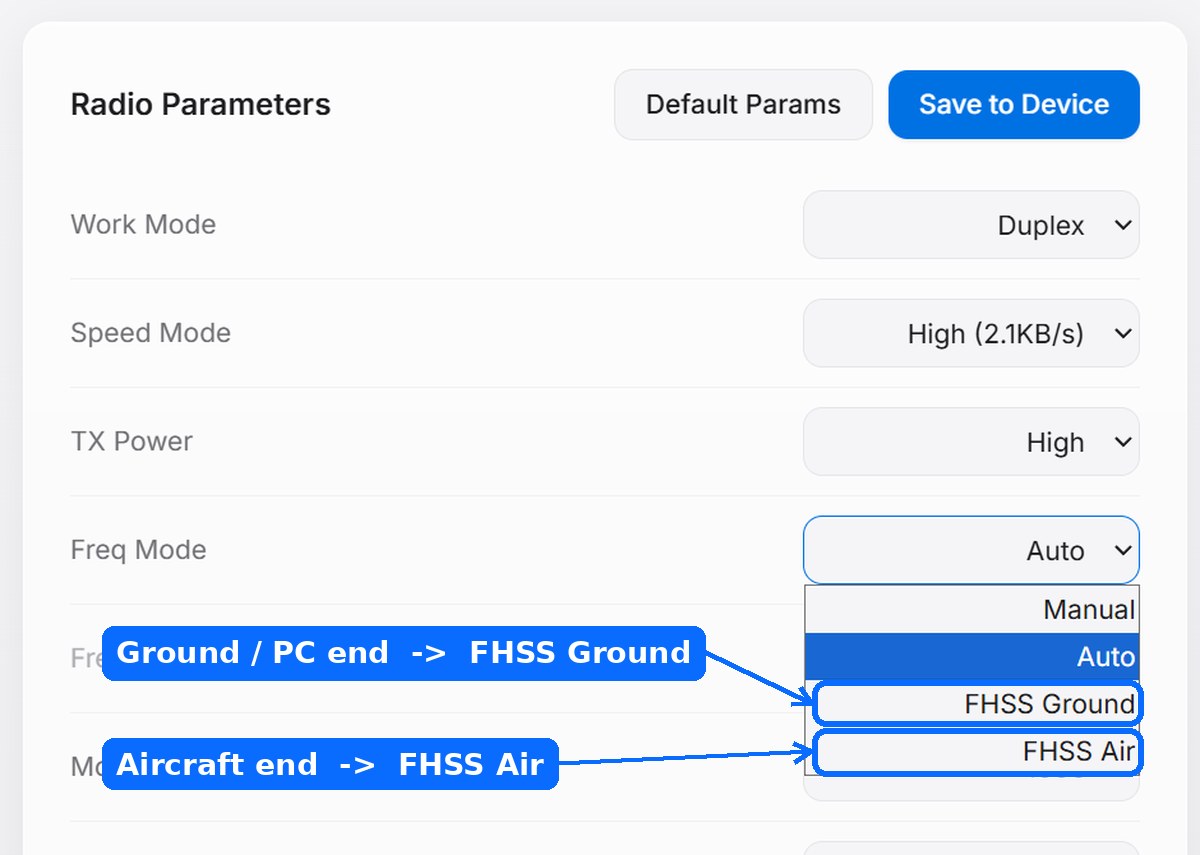
| Freq Mode | How the operating frequency is chosen. Auto just works. Manual lets you pin a channel. The two FHSS modes turn on frequency-hopping for better interference resistance (see below). | Manual · Auto · FHSS Ground · FHSS Air | Auto |
| Freq Channel | The fixed channel, only active in Manual mode (greyed out otherwise). Values 0–25 map across 890–915 MHz. | 0–25 | 0 |
| Module Addr | The pairing / network ID. Two radios only talk if their Module Addresses match. Change it to run several independent pairs nearby. | 1–30000 | 1000 |
| UART Baud Rate | Baud of the TTL serial port that wires to your flight controller. Must match the flight controller's serial baud (SERIALx_BAUD / SER_TELn_BAUD). | 9,600 · 19,200 · 38,400 · 57,600 · 115,200 | 57,600 |
| USB Baud Rate | Baud of the USB-C port to your computer / ground station. | 57,600 · 115,200 | 57,600 |
A note on FHSS (frequency hopping)
In a noisy 915 MHz environment, frequency-hopping spreads your link across many channels so a single source of interference can't block it. To use it, the two ends take different roles: the radio on the aircraft is set to FHSS Air, and the radio on the computer to FHSS Ground. FHSS also raises the downlink (aircraft → ground) rate, up to about 3.2 KB/s. Note the LR900-A does not support FHSS — use Auto on that model.
Step 3 — Save your changes
After changing values, click Save to Device (top-right of the Params panel). The Default Params button next to it resets everything to factory settings.
A link is a pair. Whatever you change that affects pairing — Module Address, Freq Mode, Speed Mode — must be set compatibly on both radios, or they won't connect.
Typical setups (copy-paste)
The LR900 is used two broad ways: as a plain long-range serial link between any two devices, and as a flight-controller telemetry radio. Here's how to set up each — pick the one that matches what you're doing.
Setup 1 — Generic 915 MHz serial link
The LR900 is a transparent UART bridge: whatever bytes go into one radio's serial port come out the other. That makes it a drop-in, long-range replacement for a wired serial connection — sensor backhaul, a microcontroller-to-PC link, an RTK base-to-rover data feed, and similar 915 MHz serial-link uses. Plenty of people buy these radios for exactly this, with no flight controller involved.
| Setting | Both radios | Notes |
|---|---|---|
| Work Mode | Duplex | Use the broadcast modes for one-to-many (e.g. one RTK base → several rovers) |
| UART Baud | match your device | set both ends to your device's baud rate |
| Module Addr | same on both | unique per link if several are nearby |
Setup 2 — Basic ArduPilot / PX4 telemetry link
The simplest drone case. Both radios keep the factory defaults; they pair on power-up (LED goes solid). You don't even need MicoAssistant for this — just wire it up and follow the flight-controller side: ArduPilot setup · PX4 setup.
| Setting | Both radios |
|---|---|
| Work Mode | Duplex |
| Speed Mode | High |
| Freq Mode | Auto |
| Module Addr | 1000 |
| UART Baud | 57600 (match your FC) |
Setup 3 — Maximum range (FHSS)
For the longest, most interference-resistant link.
| Setting | Aircraft radio | Ground (PC) radio |
|---|---|---|
| Freq Mode | FHSS Air | FHSS Ground |
| TX Power | High | High |
| Speed Mode | High | High |
| Module Addr | 1000 (same on both) | 1000 (same on both) |
Setup 4 — Several aircraft / links at once
Give each pair its own Module Address so they don't interfere. Optionally switch to Manual Freq Mode and assign each pair a different Freq Channel for extra separation.
| Pair | Module Addr | (Optional) Freq Channel |
|---|---|---|
| Link 1 | 1001 | 5 |
| Link 2 | 1002 | 12 |
| Link 3 | 1003 | 20 |
Step 4 — Verify the link
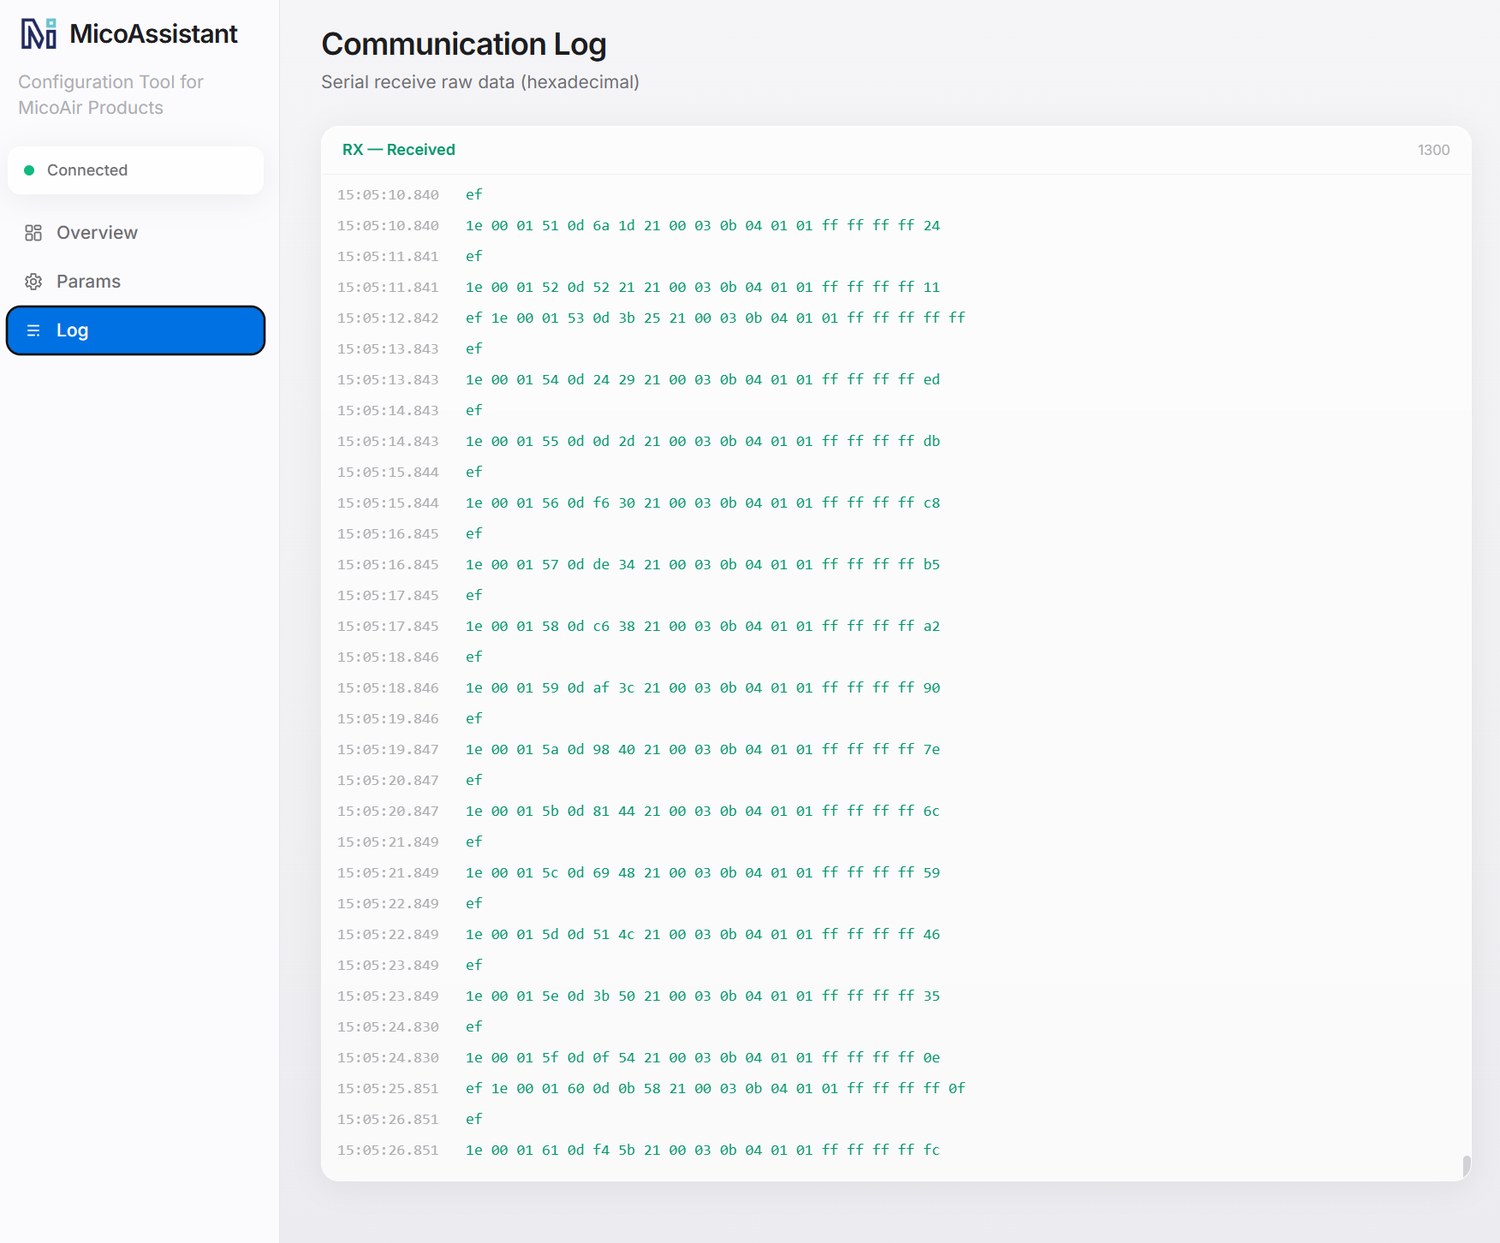
Reconnect the second radio, or switch to the Log tab to watch raw serial traffic. Bytes scrolling in the RX — Received pane confirm data is flowing across the link; on the radio itself, a solid LED means it's paired and connected.
Troubleshooting & FAQ
The browser won't open a port / "Web Serial not supported." Use Chrome or Edge — Firefox and Safari don't support the Web Serial API MicoAssistant relies on.
No port appears when I click Change Port. The USB driver isn't installed. Install the CP2102 driver (LR900-F/P) or the CH340 driver (LR900-A), then try again.
The two radios won't pair.
Check that both have the same Module Address, a compatible Freq Mode, and the same Speed Mode. If you're using FHSS, one end must be FHSS-AIR and the other FHSS-GROUND.
Do both radios need an "air" and a "ground" end? Only in FHSS mode. In the default Auto mode the two ends are interchangeable.
Can I mix an LR900-A with an LR900-F or -P? Yes — the variants interoperate. The link range is limited by whichever end has the lower transmit power, and remember the LR900-A can't do FHSS.
What baud should my flight controller use?
Match it to the radio's UART Baud Rate (default 57600). In ArduPilot that's SERIALx_BAUD = 57; in PX4 it's SER_TELn_BAUD = 57600.
Parameter behaviour is based on MicoAir's official LR900 documentation (see our LR900 User Manual, translated from micoair.cn). MicoAssistant is MicoAir's tool, available at micoair.com/assistant. Robofusion is an independent North American distributor and is not MicoAir's official support channel.